ZenStack CLI
The zenstack CLI is the primary tool for using ZenStack in a project. The CLI is intentionally designed to have similar commands to the prisma CLI.
In this chapter, we'll use the CLI to scaffold our Todo sample project. You can find the complete documentation in the CLI reference guide.
🛠️ Creating Our Sample Project
1. Initializing a Project
- Node.js 18 or above installed.
- VSCode
- ZenStack VSCode Extension
You can initialize an existing TypeScript project using the zenstack init command. To save some typing, we'll first use the "try-prisma" utility to create a simple TypeScript CLI project.
npx try-prisma@latest -n my-todo-app -t orm/script --install npm
cd my-todo-app
Then initialize the project for ZenStack:
npx zenstack@latest init
The "init" command does the following things for you:
- Install Prisma if it's not already installed.
- Install the
zenstackCLI package as a dev dependency. - Install the
@zenstackhq/runtimepackage - used for enhancingPrismaClientat the runtime. - Copy the
prisma/schema.prismafile toschema.zmodelif it exists; otherwise, create a new templateschema.zmodelfile.
You can always manually complete the steps above if you have a special project setup that the "init" command doesn't work with.
After the initialization, please remember that you should edit the schema.zmodel moving forward. The prisma/schema.prisma file will be automatically regenerated when you run zenstack generate.
2. Preparing The Schema
Replace the content of schema.zmodel with the following:
datasource db {
  provider = "sqlite"
  url      = "file:./dev.db"
}

generator js {
  provider = "prisma-client-js"
}

// where users can collaborate on todo lists and items
model Space {
  id Int @id @default(autoincrement())
  createdAt DateTime @default(now())
  updatedAt DateTime @updatedAt
  name String
  slug String @unique
  owner User @relation(fields: [ownerId], references: [id], onDelete: Cascade)
  ownerId Int
  members SpaceUser[]
  lists List[]
}

// a join table for many-to-many relation between `Space` and `User`
model SpaceUser {
  id Int @id @default(autoincrement())
  createdAt DateTime @default(now())
  updatedAt DateTime @updatedAt
  space Space @relation(fields: [spaceId], references: [id], onDelete: Cascade)
  spaceId Int
  user User @relation(fields: [userId], references: [id], onDelete: Cascade)
  userId Int
  role String @default("USER")

  @@unique([userId, spaceId])
}

// user
model User {
  id Int @id @default(autoincrement())
  createdAt DateTime @default(now())
  updatedAt DateTime @updatedAt
  email String @unique
  name String?
  spaces SpaceUser[] // user's space membership
  lists List[]
  todos Todo[]
  ownedSpaces Space[] // spaces owned by the user
}

// todo list
model List {
  id Int @id @default(autoincrement())
  createdAt DateTime @default(now())
  updatedAt DateTime @updatedAt
  space Space @relation(fields: [spaceId], references: [id], onDelete: Cascade)
  spaceId Int
  owner User @relation(fields: [ownerId], references: [id], onDelete: Cascade)
  ownerId Int
  title String
  private Boolean @default(false)
  todos Todo[]
}

// todo item
model Todo {
  id Int @id @default(autoincrement())
  createdAt DateTime @default(now())
  updatedAt DateTime @updatedAt
  owner User @relation(fields: [ownerId], references: [id], onDelete: Cascade)
  ownerId Int
  list List @relation(fields: [listId], references: [id], onDelete: Cascade)
  listId Int
  title String
  completedAt DateTime?
}
Our sample project uses a SQLite database. You can use any other database supported by Prisma. Please refer to the Prisma docs for more details.
Take some time to familiarize yourself with the entities and their relations.

3. Generating Artifacts
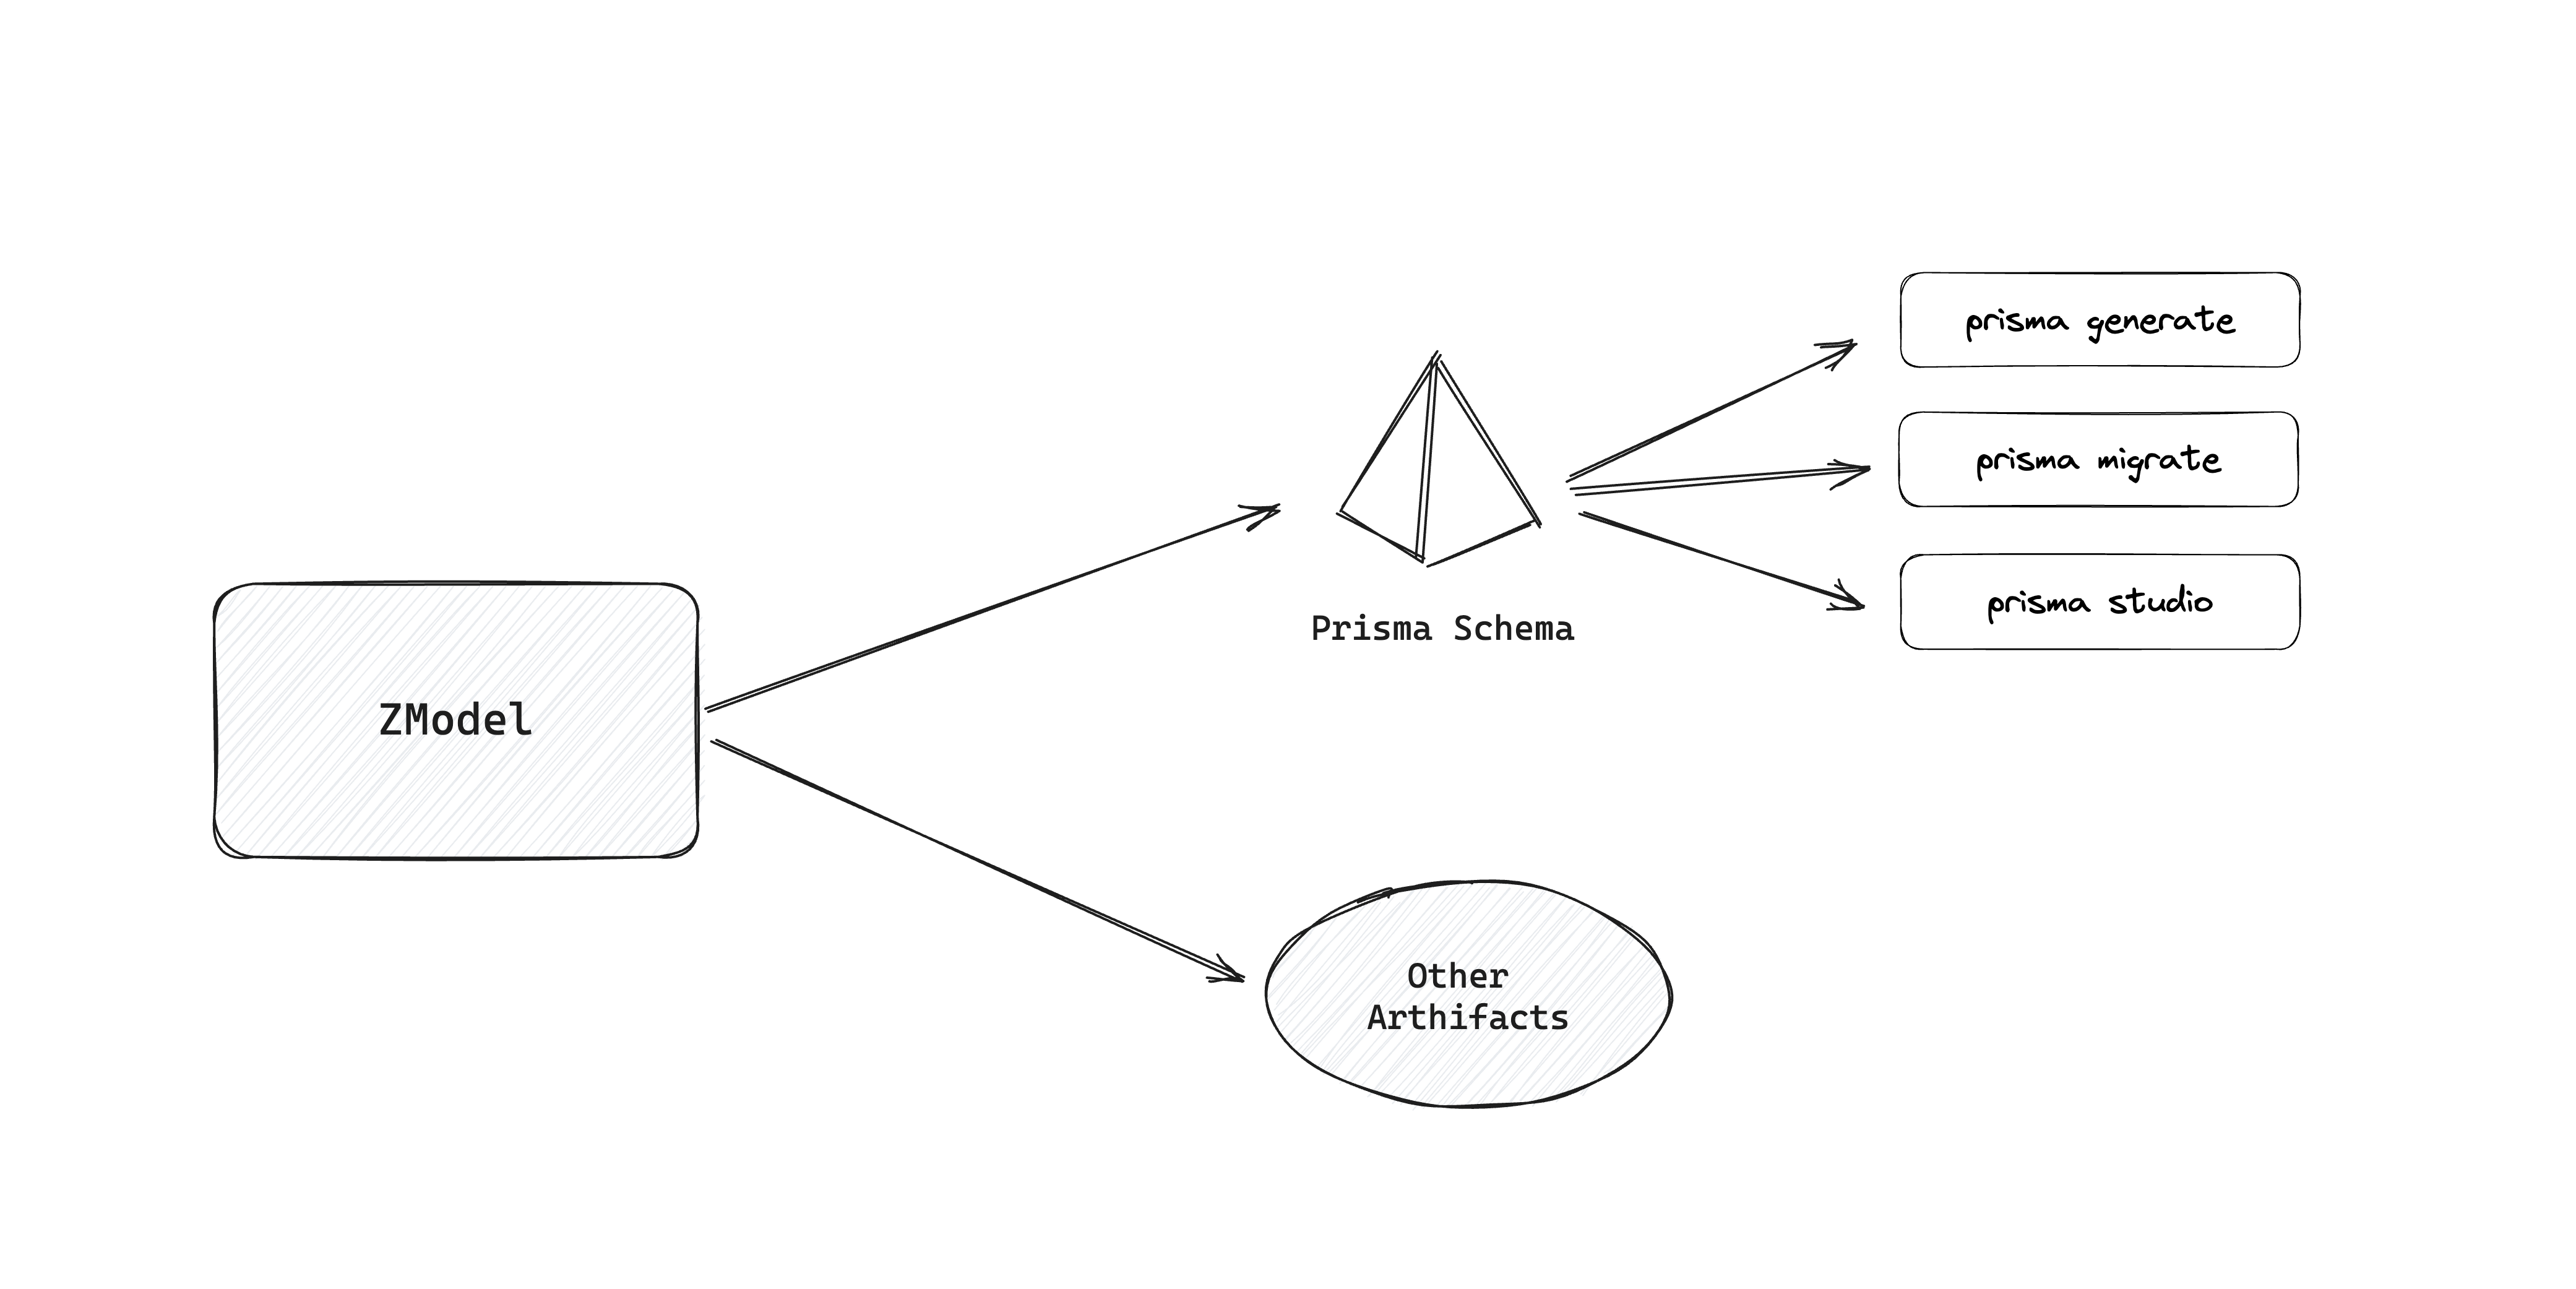
The CLI command you'll most often use is zenstack generate. It runs plugins (including the built-in ones that are automatically enabled and the ones you explicitly put into ZModel) to generate various artifacts.
npx zenstack generate
The most important artifact is the Prisma schema. It's generated into the prisma/schema.prisma file by default. The command also automatically runs prisma generate to regenerate the Prisma Client.
You should see output like the following in your terminal:
⌛️ ZenStack CLI vx.y.z, running plugins
✔ Generating Prisma schema
✔ Generating PrismaClient enhancer
✔ Generating Zod schemas

👻 All plugins completed successfully!
Don't forget to restart your dev server to let the changes take effect.
A bunch of plugins are run. When it is complete, the prisma/schema.prisma file should be updated to contain the new models we added. You can also use the models in your TS code now since the Prisma Client code has also been regenerated.
Finally, push the schema to the database:
npx prisma db push
4. Seeding The Database
Let's create a seed script to populate some test data into our database. Create a new file prisma/seed.ts with the following content:
import { PrismaClient } from '@prisma/client';

const prisma = new PrismaClient();

async function main() {
    // clean up
    await prisma.user.deleteMany();
    await prisma.space.deleteMany();

    const joey = await prisma.user.create({
        data: {
            email: 'joey@zenstack.dev',
            name: 'Joey'
        }
    });
    console.log('User created:', joey);

    const rachel = await prisma.user.create({
        data: {
            email: 'rachel@zenstack.dev',
            name: 'Rachel'
        }
    });
    console.log('User created:', rachel);

    const centralPerk = await prisma.space.create({
        data: {
            name: 'Central Perk',
            slug: 'central-perk',
            owner: { connect: { id: rachel.id } },
            members: {
                create: [
                    {
                        user: { connect: { id: joey.id } },
                        role: 'USER'
                    },
                    {
                        user: { connect: { id: rachel.id } },
                        role: 'ADMIN'
                    }
                ]
            }
        }
    });
    console.log('Space created:', centralPerk);

    const rachelPersonal = await prisma.space.create({
        data: {
            name: "Rachel's Personal Space",
            slug: 'rachel',
            owner: { connect: { id: rachel.id } },
            members: {
                create: [
                    {
                        user: { connect: { id: rachel.id } },
                        role: 'ADMIN'
                    }
                ]
            }
        }
    });
    console.log('Space created:', rachelPersonal);
}

main()
    .then(async () => {
        await prisma.$disconnect();
    })
    .catch(async (e) => {
        console.error(e);
        await prisma.$disconnect();
        process.exit(1);
    });
Then add the seed script into "package.json":
{
    ...
    "prisma": {
        "seed": "ts-node prisma/seed.ts"
    }
}
Finally, run the seed command to load the data into the database:
npx prisma db seed
Running seed command `ts-node prisma/seed.ts` ...
User created: {
  id: 1,
  createdAt: 2023-11-07T21:37:22.506Z,
  updatedAt: 2023-11-07T21:37:22.506Z,
  email: 'joey@zenstack.dev',
  name: 'Joey'
}
User created: {
  id: 2,
  createdAt: 2023-11-07T21:37:22.509Z,
  updatedAt: 2023-11-07T21:37:22.509Z,
  email: 'rachel@zenstack.dev',
  name: null
}
Space created: {
  id: 1,
  createdAt: 2023-11-07T21:37:22.510Z,
  updatedAt: 2023-11-07T21:37:22.510Z,
  name: 'Central Perk',
  slug: 'central-perk'
}
Space created: {
  id: 2,
  createdAt: 2023-11-07T21:37:22.512Z,
  updatedAt: 2023-11-07T21:37:22.512Z,
  name: "Rachel's Personal Space",
  slug: 'rachel'
}

🌱  The seed command has been executed.
5. Querying Data With REPL
ZenStack CLI comes with a convenient REPL mode that you can use to query data interactively. We'll use it to demonstrate ZenStack's features throughout the guide. Let's try a few commands here:
Enter the REPL mode:
npx zenstack repl
The REPL provides a global prisma instance that you can use directly. Execute a few queries (the REPL automatically awaits the result Promises):
prisma.user.findFirst()
{
  id: 1,
  createdAt: 2023-11-07T21:37:22.506Z,
  updatedAt: 2023-11-07T21:37:22.506Z,
  email: 'joey@zenstack.dev',
  name: 'Joey'
}
prisma.space.findFirst({ include: { members: true } })
{
  id: 1,
  createdAt: 2023-11-07T21:37:22.510Z,
  updatedAt: 2023-11-07T21:37:22.510Z,
  name: 'Central Perk',
  slug: 'central-perk',
  members: [
    {
      id: 1,
      createdAt: 2023-11-07T21:37:22.510Z,
      updatedAt: 2023-11-07T21:37:22.510Z,
      spaceId: 1,
      userId: 2,
      role: 'ADMIN'
    },
    {
      id: 2,
      createdAt: 2023-11-07T21:37:22.510Z,
      updatedAt: 2023-11-07T21:37:22.510Z,
      spaceId: 1,
      userId: 1,
      role: 'USER'
    }
  ]
}
The REPL also provides a db variable for querying data with access control. We'll get back to it in chapter 4.
You can exit the REPL with the .exit command.
6. Listing Installed ZenStack Packages
ZenStack provides multiple npm packages that implement either plugins or runtime functionalities. The zenstack and @zenstackhq/runtime packages are almost always needed. The other packages are optional and can be installed based on your needs.
When you upgrade ZenStack, it's important to keep all package versions in sync to avoid unexpected results. The zenstack info command can help you list all installed ZenStack packages and their versions. It also checks and prompts if there are newer versions available.
Try running it in our project:
npx zenstack info
Installed ZenStack Packages:
    zenstack                    x.y.z
    @zenstackhq/runtime         x.y.z
✔ Checking npm registry
You are using the latest version of ZenStack.
ZenStack CLI & Prisma CLI
The ZenStack CLI is not meant for replacing the Prisma CLI. After zenstack generate generates the Prisma schema, you can use the Prisma CLI as you normally do to complete tasks like:
- Creating migration records with
prisma migrate dev - Pushing schema changes to the db with
prima db push - Launching Prisma Studio with
prisma studio - ...
The Prisma development workflow that you're already familiar with should work seamlessly with ZenStack. See here for a detailed explanation of the development workflow.