Building a Secure Database-Centric OpenAPI in 15 Minutes


If you are a developer familiar with RESTful APIs, you might have heard of OpenAPI. It is a specification for describing RESTful APIs in a format readable for humans and machines. Building a public-facing OpenAPI includes three tasks:
- Authoring an OpenAPI specification which serves as the contract between the API provider and the API consumer.
- Implementing the API endpoints based on the specification.
- Optionally, implementing client SDKs for consuming the API.
In this post, you'll see how to accomplish all these tasks and build a database-centric OpenAPI service, secure and documented, within 15 minutes.
You can find the finished project here.
Scenario
I will use a simple Pet Store API as an example to facilitate easier understanding. The API will have the following resources:
- User: who can signup, login, and order pets.
- Pet: which can be listed and ordered by users.
- Order: which is created by users and contains a list of pets.
Business rules:
- Anonymous users can sign up and log in.
- Anonymous users can list unsold pets.
- Authenticated users can list unsold pets and pets ordered by them.
- Authenticated users can create orders for unsold pets.
- Authenticated users can view their orders.
Building it up
We'll use Express.js as the framework for building the service. However, other frameworks, like Fastify, can be used as well, and the general process is similar.
1. Creating the project
Let's first create a new Express.js project with Typescript.
mkdir express-petstore
cd express-petstore
npm init -y
npm install express
npm install -D typescript tsx @types/node @types/express
npx tsc --init
Create the service entrance point code app.ts with the following content:
import express from 'express';

const app = express();

// enable JSON body parser
app.use(express.json());

app.get('/', (req, res) => {
    res.send('Hello World!');
});

app.listen(3000, () => console.log('🚀 Server ready at: http://localhost:3000'));
Start the server:
npx tsx watch app.ts
Now in a new shell window, hit the service endpoint and verify it works:
curl localhost:3000
Hello World!
2. Modeling data
Data modeling is the most crucial part of building a resource-centric API. In this guide, we'll use Prisma and ZenStack to model the database. Prisma is a toolkit that offers a declarative data modeling experience, and ZenStack is a power pack to Prisma providing enhancements like access control, specification generation, automatic service generation, and many other improvements.
Let's first initialize our project for data modeling:
npm install -D prisma
npm install @prisma/client
npx zenstack@latest init
The zenstack CLI installs Prisma and other dependencies and creates a boilerplate schema.zmodel file. Update it with the following content to reflect our requirements:
datasource db {
    provider = 'sqlite'
    url = 'file:./petstore.db'
}

generator client {
    provider = "prisma-client-js"
}

model User {
    id String @id @default(cuid())
    email String @unique
    password String
    orders Order[]
}

model Pet {
    id String @id @default(cuid())
    createdAt DateTime @default(now())
    updatedAt DateTime @updatedAt
    name String
    category String
    order Order? @relation(fields: [orderId], references: [id])
    orderId String?
}

model Order {
    id String @id @default(cuid())
    createdAt DateTime @default(now())
    updatedAt DateTime @updatedAt
    pets Pet[]
    user User @relation(fields: [userId], references: [id])
    userId String
}
Run the following command to generate Prisma schema and push it to the database:
npx zenstack generate
npx prisma db push
Also, create a prisma/seed.ts file that populates the database with some data. Then, when you reset your local database, you can rerun the script to fill in the data.
import { PrismaClient, Prisma } from '@prisma/client';

const prisma = new PrismaClient();

const petData: Prisma.PetCreateInput[] = [
    {
        id: 'luna',
        name: 'Luna',
        category: 'kitten',
    },
    {
        id: 'max',
        name: 'Max',
        category: 'doggie',
    },
    {
        id: 'cooper',
        name: 'Cooper',
        category: 'reptile',
    },
];

async function main() {
    console.log(`Start seeding ...`);
    for (const p of petData) {
        const pet = await prisma.pet.create({
            data: p,
        });
        console.log(`Created Pet with id: ${pet.id}`);
    }
    console.log(`Seeding finished.`);
}

main()
    .then(async () => {
        await prisma.$disconnect();
    })
    .catch(async (e) => {
        console.error(e);
        await prisma.$disconnect();
        process.exit(1);
    });
Run the script to seed our database:
npx tsx prisma/seed.ts
3. Implementing the API
ZenStack dramatically simplifies the development of database-centric APIs by providing a built-in RESTful implementation. You can use a framework-specific adapter to install the RESTful services into your application. Let's see how to do it with Express.js.
npm install @zenstackhq/server
The integration with Express.js is achieved by the ZenStackMiddleware middleware factory. Use it to mount the RESTful APIs at the path of your choice. The getPrisma callback is used to get a Prisma client instance for the current request. For now, we'll just return the global Prisma client.
import { PrismaClient } from '@prisma/client';
import { ZenStackMiddleware } from '@zenstackhq/server/express';
import express from 'express';

const app = express();
app.use(express.json());

const prisma = new PrismaClient();
app.use('/api', ZenStackMiddleware({ getPrisma: () => prisma }));

app.listen(3000, () => console.log('🚀 Server ready at: http://localhost:3000'));
With these few lines of code, you've got CRUD APIs running for all resources - User, Pet, and Order. Test it by fetching all pets:
curl localhost:3000/api/pet/findMany
[
    {
        "id": "luna",
        "createdAt": "2023-03-18T08:09:41.417Z",
        "updatedAt": "2023-03-18T08:09:41.417Z",
        "name": "Luna",
        "category": "kitten"
    },
    {
        "id": "max",
        "createdAt": "2023-03-18T08:09:41.419Z",
        "updatedAt": "2023-03-18T08:09:41.419Z",
        "name": "Max",
        "category": "doggie"
    },
    {
        "id": "cooper",
        "createdAt": "2023-03-18T08:09:41.420Z",
        "updatedAt": "2023-03-18T08:09:41.420Z",
        "name": "Cooper",
        "category": "reptile"
    }
]
Easy, isn't it? The automatically generated APIs have 1:1 mapping to Prisma client methods - findMany, findUnique, create, update, aggregate, etc. They also have the same structure as PrismaClient for input arguments and responses. For POST and PUT requests, the input args are sent directly as the request body (application/json). For GET and DELETE requests, the input args is JSON serialized and sent as the q query parameters (url-encoded). For example, you can get a filtered list of pets by:
curl 'http://localhost:3000/api/pet/findMany?q=%7B%22where%22%3A%7B%22category%22%3A%22doggie%22%7D%7D'
URL is encoded from: http://localhost:3000/api/pet/findMany?q={"where":{"category":"doggie"}}
[
    {
        "id": "max",
        "createdAt": "2023-03-18T08:09:41.419Z",
        "updatedAt": "2023-03-18T08:09:41.419Z",
        "name": "Max",
        "category": "doggie"
    }
]
Our API is up and running, but it has one big problem: it's not guarded by any security measures. Anybody can read and update any data. Let's fix that in the following sections in two steps: authentication and authorization.
4. Adding authentication
For this simple service, we'll adopt an email/password based authentication and issue a JWT token for each successful login.
Let's first look at the signup part. Since the User resource already has a CRUD API, we don't need to implement a separate API for signup, since signup is just creating a User. The only thing that we need to take care of is to make sure we store hashed passwords instead of plain text. Achieving this is simple; just add a @password attribute to the password field. ZenStack will automatically hash the field before storing it in the database. Note that we also added the @omit attribute to mark password field to be dropped from the response since we don't want it ever to be returned to the client.
model User {
    id String @id @default(cuid())
    email String @unique
    password String @password @omit
    orders Order[]
}
Login requires verification of credentials, and we need to implement it manually. Install several new dependencies:
npm install bcryptjs jsonwebtoken dotenv
npm install -D @types/jsonwebtoken
Create a .env file under the root and put a JWT_SECRET environment variable in it. You should always use a strong secret in production.
JWT_SECRET=abc123
Add the /api/login route as the following:
import dotenv from 'dotenv';
import jwt from 'jsonwebtoken';
import { compareSync } from 'bcryptjs';

// load .env environment variables
dotenv.config();

app.post('/api/login', async (req, res) => {
    const { email, password } = req.body;
    const user = await prisma.user.findFirst({
        where: { email },
    });
    if (!user || !compareSync(password, user.password)) {
        res.status(401).json({ error: 'Invalid credentials' });
    } else {
        // sign a JWT token and return it in the response
        const token = jwt.sign({ sub: user.id }, process.env.JWT_SECRET!);
        res.json({ id: user.id, email: user.email, token });
    }
});
Finally, change the getPrisma callback in the ZenStackMiddleware to an enhanced Prisma client returned by the enhance call so that the @password and @omit attributes can take effect.
import { enhance } from '@zenstackhq/runtime';
app.use('/api', ZenStackMiddleware({ getPrisma: () => enhance(prisma) }));
Beware that with the enhanced Prisma client, all CRUD operations are denied by default unless you open them up explicitly. Let's open up the create and read operations for User to support the signup/login flow:
model User {
    id String @id @default(cuid())
    email String @unique
    password String @password @omit
    orders Order[]

    // everybody can signup
    @@allow('create', true)

    // user profile is publicly readable
    @@allow('read', true)
}
Now regenerate Prisma schema and push the changes to the database:
npx zenstack generate && npx prisma db push
Restart the dev server, and we can test out our signup/login flow.
Sign up a user:
curl -X POST localhost:3000/api/user/create \
    -H 'Content-Type: application/json' \
    -d '{ "data": { "email": "tom@pet.inc", "password": "abc123" } }'
{
    "id": "clfan0lys0000vhtktutornel",
    "email": "tom@pet.inc"
}
Login:
curl -X POST localhost:3000/api/login \
    -H 'Content-Type: application/json' \
    -d '{ "email": "tom@pet.inc", "password": "abc123" }'
{
    "id": "clfan0lys0000vhtktutornel",
    "email": "tom@pet.inc",
    "token": "..."
}
5. Adding authorization
Now that we have authentication in place, we can add access control rules to our schema to secure our CRUD service. Make the following changes to the Pet and Order models:
model Pet {
    id String @id @default(cuid())
    createdAt DateTime @default(now())
    updatedAt DateTime @updatedAt
    name String
    category String
    order Order? @relation(fields: [orderId], references: [id])
    orderId String?

    // unsold pets are readable to all; sold ones are readable to buyers only
    @@allow('read', orderId == null || order.user == auth())

    // only allow update to 'orderId' field if it's not set yet (unsold)
    @@allow('update', name == future().name && category == future().category && orderId == null )
}

model Order {
    id String @id @default(cuid())
    createdAt DateTime @default(now())
    updatedAt DateTime @updatedAt
    pets Pet[]
    user User @relation(fields: [userId], references: [id])
    userId String

    // users can read their orders
    @@allow('read,create', auth() == user)
}
The syntax for @@allow and @@deny is pretty self-explanatory. A few things to note:
- The
auth()function returns the currently authenticated user. You'll see how it's hooked up shortly. - The
future()function returns the entity value after an update is applied. - The second
@@allowrule on thePetmodel looks a bit complex. It's needed because we want to disallow creating orders that include sold pets. On the database level, it means that theorderIdfield ofPetcan only be updated if it'snull(meaning it's not sold yet). We also used thefuture()function to disallow updates to other fields.
You can learn more about access policies here.
By declaratively defining access policies in the schema, you don't need to implement these rules in your API anymore. It's easier to ensure consistency, making the schema a single source of truth for your data's shape and security rules.
There's one piece still missing, though: we need to hook the authenticated user identity into the system so that the auth() function works. To do that, we require the API callers to carry the JWT token as a bearer token in the Authorization header. Then, on the server side, we extract it from the current request and pass it to the enhance call as the context.
Add a getUser helper to decode the user from the token, and pass that to the enhance call:
import type { Request } from 'express';

function getUser(req: Request) {
    const token = req.headers.authorization?.split(' ')[1];
    console.log('TOKEN:', token);
    if (!token) {
        return undefined;
    }
    try {
        const decoded: any = jwt.verify(token, process.env.JWT_SECRET!);
        return { id: decoded.sub };
    } catch {
        // bad token
        return undefined;
    }
}

app.use(
    '/api',
    ZenStackMiddleware({
        getPrisma: (req) => {
            return enhance(prisma, { user: getUser(req) });
        },
    })
);
Now the policy engine has access to the authenticated user and can enforce the authorization rules. Rerun code generation and restart the dev server. Now let's test out the authorization.
npx zenstack generate && npx prisma db push
6. Testing out authorization
Login to get a token:
curl -X POST localhost:3000/api/login \
    -H 'Content-Type: application/json' \
    -d '{ "email": "tom@pet.inc", "password": "abc123" }'
{
    "id": "<user id>",
    "email": "tom@pet.inc",
    "token": "<token>"
}
Store the returned user id and token in environment variables for future use:
userId=<user id>
token=<token>
Create an order:
Place an order for the "Luna" cat. Note that we pass the token in the Authorization header.
curl -X POST localhost:3000/api/order/create \
    -H 'Content-Type: application/json' -H "Authorization: Bearer $token"  \
    -d "{ \"data\": { \"userId\": \"$userId\", \"pets\": { \"connect\": { \"id\": \"luna\" } } } }"
{
    "id": "clfapaykz0002vhwr634sd9l7",
    "createdAt": "2023-03-16T05:59:04.586Z",
    "updatedAt": "2023-03-16T05:59:04.586Z",
    "userId": "clfan0lys0000vhtktutornel"
}
List pets anonymously:
"Luna" is gone now because it's sold.
curl localhost:3000/api/pet/findMany
[
    {
        "id": "max",
        "createdAt": "2023-03-16T04:53:26.205Z",
        "updatedAt": "2023-03-16T04:53:26.205Z",
        "name": "Max",
        "category": "doggie"
    },
    {
        "id": "cooper",
        "createdAt": "2023-03-16T04:53:26.206Z",
        "updatedAt": "2023-03-16T04:53:26.206Z",
        "name": "Cooper",
        "category": "reptile"
    }
]
List pets with credentials:
"Luna" is visible again (with an orderId on it) because the user who makes an order can read pets in it.
curl localhost:3000/api/pet/findMany -H "Authorization: Bearer $token"
[
    {
        "id": "luna",
        "createdAt": "2023-03-16T04:53:26.203Z",
        "updatedAt": "2023-03-16T05:59:04.586Z",
        "name": "Luna",
        "category": "kitten",
        "orderId": "clfapaykz0002vhwr634sd9l7"
    },
    {
        "id": "max",
        "createdAt": "2023-03-16T04:53:26.205Z",
        "updatedAt": "2023-03-16T04:53:26.205Z",
        "name": "Max",
        "category": "doggie"
    },
    {
        "id": "cooper",
        "createdAt": "2023-03-16T04:53:26.206Z",
        "updatedAt": "2023-03-16T04:53:26.206Z",
        "name": "Cooper",
        "category": "reptile"
    }
]
Creating an order for "Luna" again will result in an error:
curl -X POST localhost:3000/api/order/create \
    -H 'Content-Type: application/json' -H "Authorization: Bearer $token"  \
    -d "{ \"data\": { \"userId\": \"$userId\", \"pets\": { \"connect\": { \"id\": \"luna\" } } } }"
{
    "prisma": true,
    "rejectedByPolicy": true,
    "code": "P2004",
    "message": "denied by policy: Pet entities failed 'update' check, 1 entity failed policy check"
}
You can continue testing with the Order model and see if its behavior conforms to the access policies.
Generating OpenAPI specification
So far, we've implemented a secure REST-like API. It doesn't fully conform to RESTful API's resource-oriented API endpoint design, but it fully preserves Prisma's data query flexibility.
To call it an OpenAPI, we have to offer a formal specification. Fortunately, ZenStack can generate OpenAPI V3 specifications for you. You only need to turn on the plugin in your schema:
npm install -D @zenstackhq/openapi
Enable the OpenAPI plugin in the schema.zmodel file:
plugin openapi {
    provider = '@zenstackhq/openapi'
    prefix = '/api'
    title = 'Pet Store API'
    version = '0.1.0'
    description = 'My awesome pet store API'
    output = 'petstore-api.json'
}
When you run zenstack generate, it will generate a petstore-api.json file for you. You can serve it to your API consumer with tools like Swagger UI.
npx zenstack generate
There is a caveat, though: remember we manually implemented the /api/login endpoint? ZenStack doesn't know that, and the generated JSON spec doesn't include it. However, we can use some extra tooling to fix that.
First, install some new dependencies:
npm install swagger-ui-express express-jsdoc-swagger
npm install -D @types/swagger-ui-express
Then add JSDoc to specify its input and output to the /api/login route:
/**
 * Login input
 * @typedef {object} LoginInput
 * @property {string} email.required - The email
 * @property {string} password.required - The password
 */

/**
 * Login response
 * @typedef {object} LoginResponse
 * @property {string} id.required - The user id
 * @property {string} email.required - The user email
 * @property {string} token.required - The access token
 */

/**
 * POST /api/login
 * @tags user
 * @param {LoginInput} request.body.required - input
 * @return {LoginResponse} 200 - login response
 */
app.post('/api/login', async (req, res) => {
    ...
}
The JSDoc attaches OpenAPI metadata to the /api/login route. We can then use express-jsdoc-swagger and swagger-ui-express to merge these two fragments of API specification and server a Swagger UI for it:
import expressJSDocSwagger from 'express-jsdoc-swagger';

// load the CRUD API spec from the JSON file generated by `zenstack`
const crudApiSpec = require('./petstore-api.json');

// options for loading the extra OpenAPI from JSDoc
const swaggerOptions = {
    info: {
        version: '0.1.0',
        title: 'Pet Store API',
    },
    filesPattern: './app.ts', // scan app.ts for OpenAPI JSDoc
    baseDir: __dirname,
    exposeApiDocs: true,
    apiDocsPath: '/v3/api-docs', // serve the merged JSON specifcation at /v3/api-docs
};

// merge two specs and serve the UI
expressJSDocSwagger(app)(swaggerOptions, crudApiSpec);
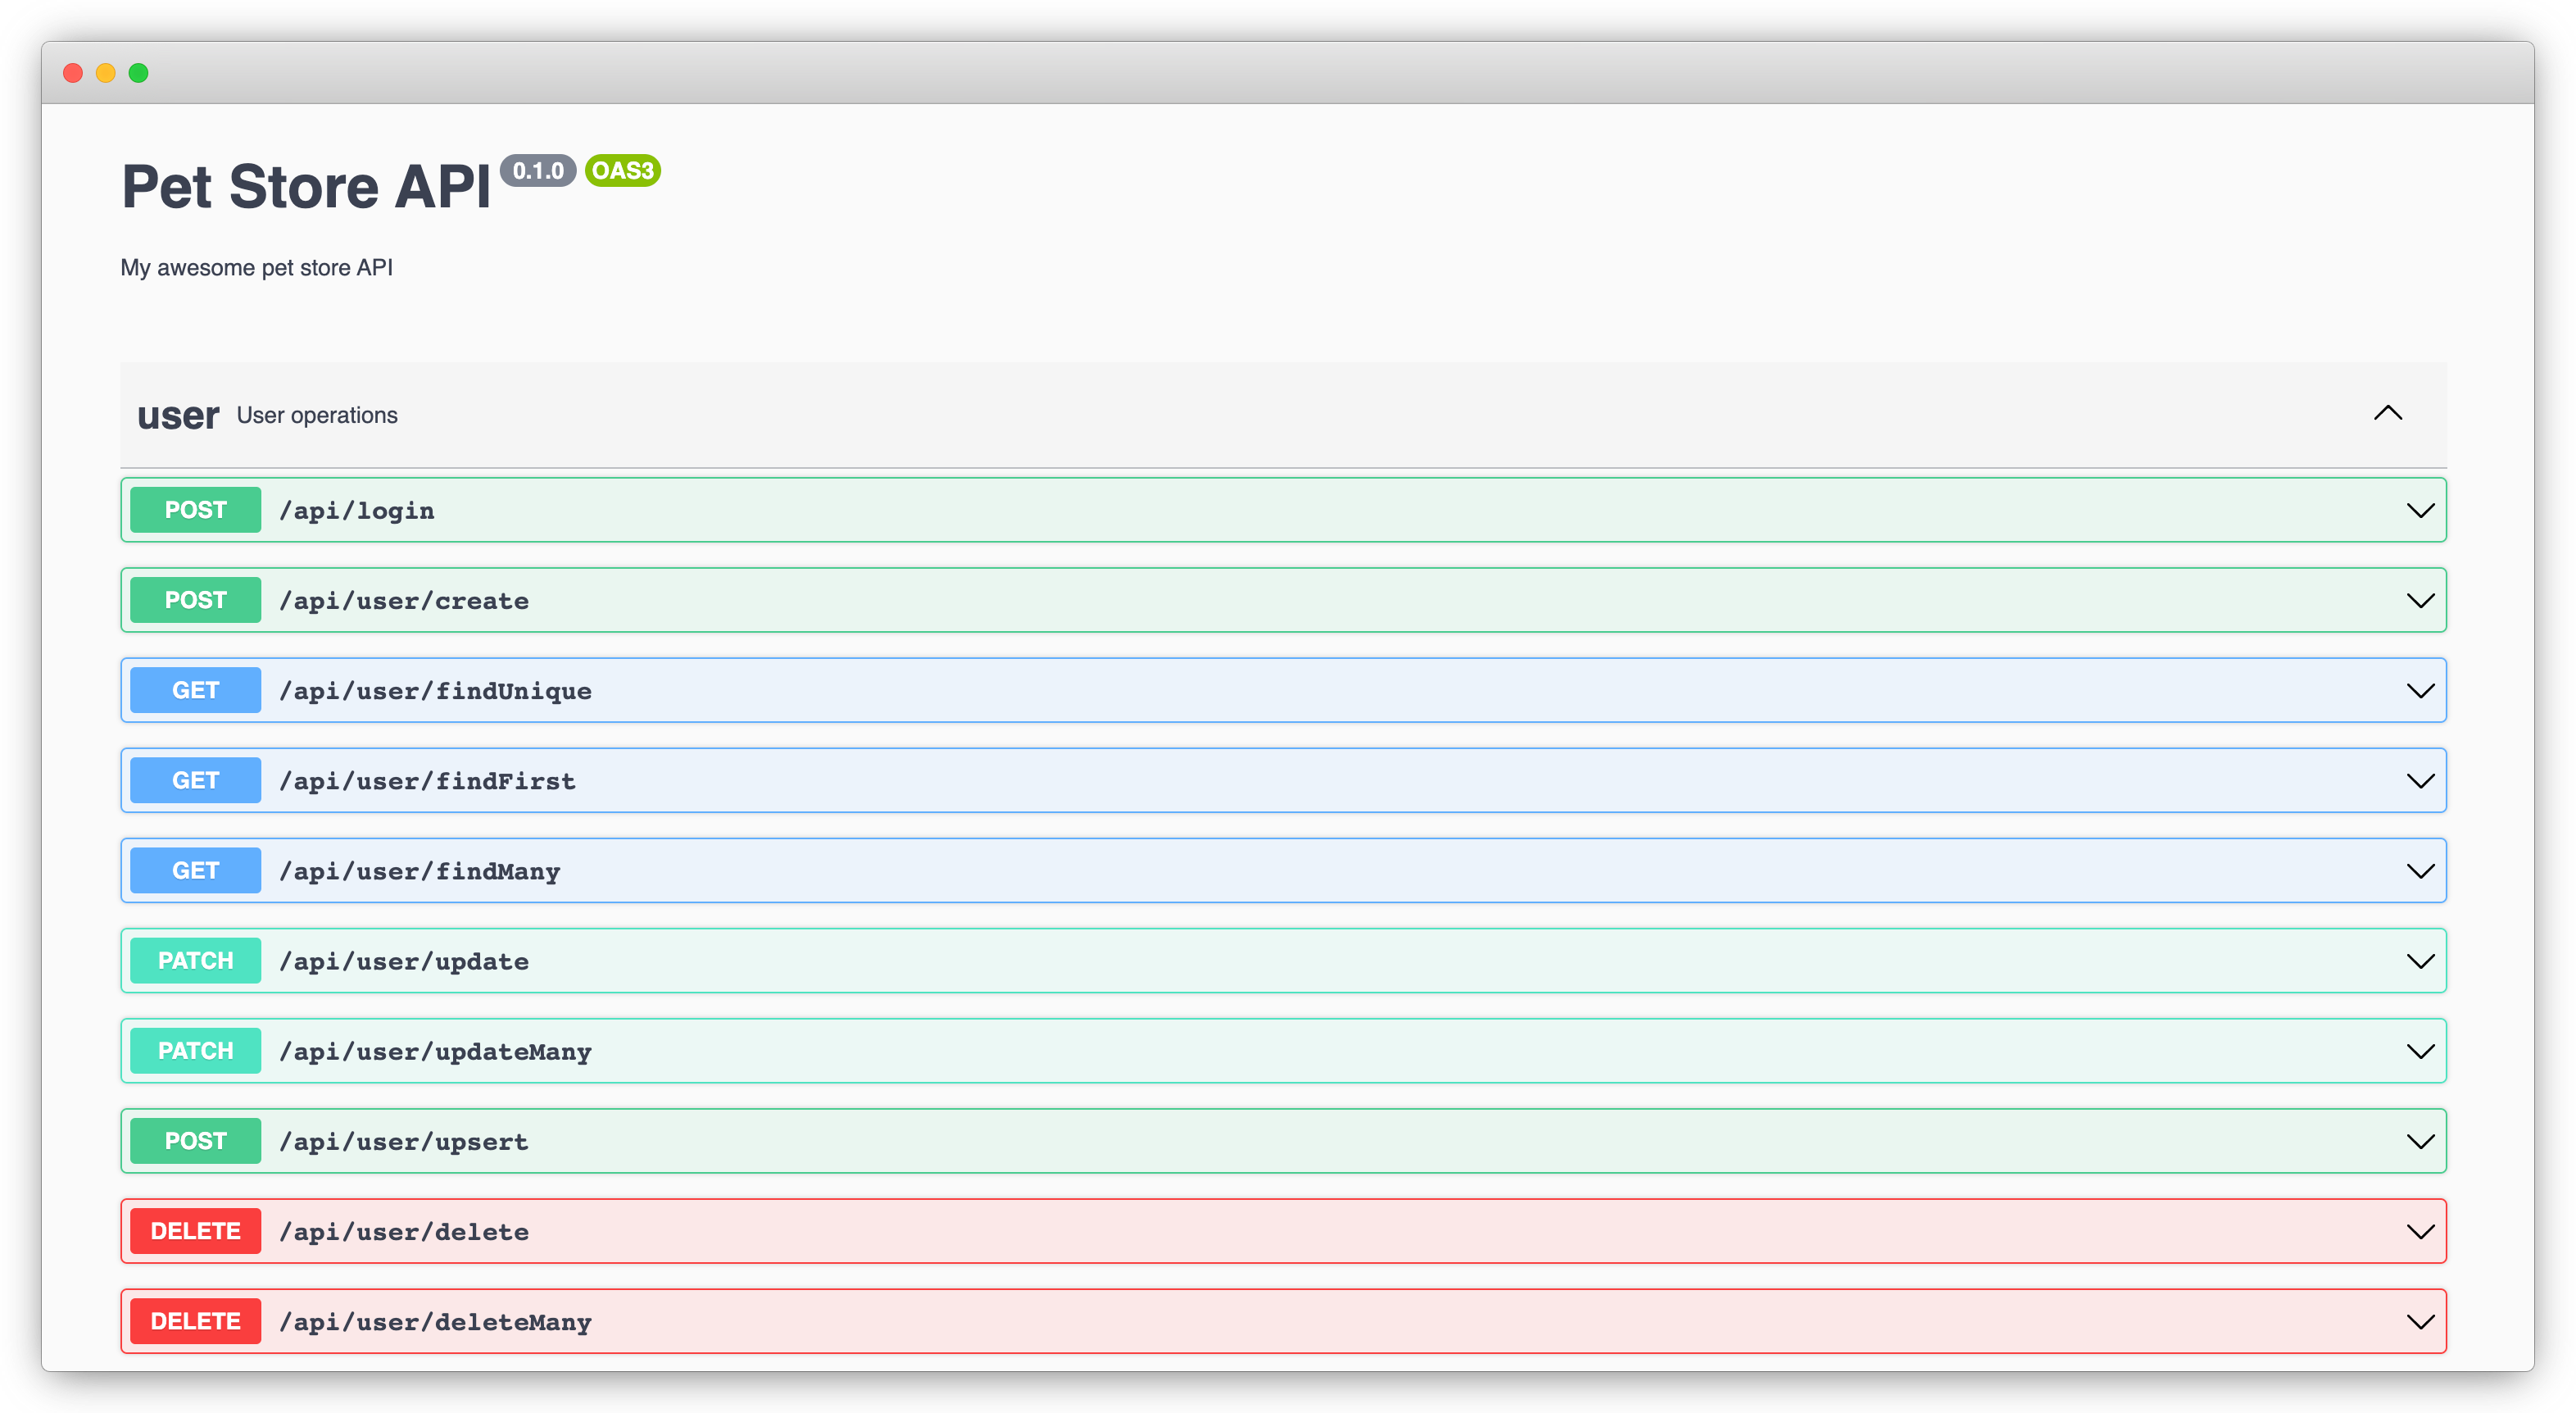
Now if you hit http://localhost:3000/api-docs, you'll see the API documentation UI. You can also access the raw JSON spec at http://localhost:3000/v3/api-docs.
Generating Client SDK
Great! We've got a running service with a formal specification. Now the consumers can implement clients to talk to it using any HTTP client. With the OpenAPI specification, we can take one more step to generate a strong-typed client SDK for them.
In this sample, we'll achive it using openapi-typescript and openapi-typescript-fetch.
npm install -D openapi-typescript @types/node-fetch
npm install node-fetch openapi-typescript-fetch
npx openapi-typescript http://localhost:3000/v3/api-docs --output ./client-types.ts
We can then use the generated types to do strongly-typed API calls (for both input and output). Create a client.ts to try it out:
import fetch, { Headers, Request, Response } from 'node-fetch';
import { Fetcher } from 'openapi-typescript-fetch';
import { paths } from './client-types';

// polyfill `fetch` for node
if (!globalThis.fetch) {
    globalThis.fetch = fetch as any;
    globalThis.Headers = Headers as any;
    globalThis.Request = Request as any;
    globalThis.Response = Response as any;
}

async function main() {
    const fetcher = Fetcher.for<paths>();
    fetcher.configure({
        baseUrl: 'http://localhost:3000',
    });

    const login = fetcher.path('/api/login').method('post').create();
    const { data: loginResult } = await login({
        email: 'tom@pet.inc',
        password: 'abc123',
    });
    // loginResult is typed as { id: string, email: string, token: string }
    console.log('Login result:', JSON.stringify(loginResult, undefined, 2));
    const token = loginResult.token;

    // get orders together with their pets
    const getOrders = fetcher.path(`/api/order/findMany`).method('get').create();
    const { data: orders } = await getOrders(
        { q: JSON.stringify({ include: { pets: true } }) },
        { headers: { Authorization: `Bearer ${token}` } }
    );
    console.log('Orders:', JSON.stringify(orders, undefined, 2));
}

main();
You can run it with:
npx tsx client.ts
Wrap up
Building a database-centric OpenAPI service involves many tasks: designing the data model, authoring the specification, implementing the service, and generating the client SDK. But, as you can see, it doesn't need to be hard and time-consuming.
The key takeaway is that if you can use a single source of truth to represent your data schema and access rules, many other artifacts can be generated from it. It saves your precious time from writing boilerplate code and also makes it much easier to keep everything in sync along the way.
The finished project can be found here.