Get Started With SvelteKit
Let's have some fun by creating a simple blogging app. You'll see how effortless it is to have a secure backend service without actually coding it.
You can find the final build result here.
Requirements
Our target app should meet the following requirements:
- Email/password-based signin/signup.
- Users can create posts for themselves.
- Post owners can update/publish/unpublish/delete their own posts.
- Users cannot make changes to posts that do not belong to them.
- Published posts can be viewed by all logged-in users.
Let's get started 🚀.
Prerequisite
- Make sure you have Node.js 18 or above installed.
- Install the VSCode extension for editing data models.
Building the app
1. Create a new project
The easiest way to create a SvelteKit project with boilerplates is with npm create svelte. Run the following command to create a new project:
npm create svelte@latest my-blog-app
Choose the following options when prompted:
-
Which Svelte app template?
Skeleton project
-
Add type checking with TypeScript?
Yes, using TypeScript syntax
-
Select additional options (use arrow keys/space bar)
Add ESLint for code linting, Add Prettier for code formatting
2. Configure TailwindCSS
Follow the guide here to add TailwindCSS to your project.
3. Initialize the project for ZenStack
Let's run the zenstack CLI to prepare your project for using ZenStack. Inside your project directory, run the following command:
npx zenstack@latest init
The command installs a few NPM dependencies. If the project already has a Prisma schema at prisma/schema.prisma, it's copied over to schema.zmodel. Otherwise, a sample schema.zmodel file is created.
Moving forward, you will keep updating schema.zmodel file, and prisma/schema.prisma will be automatically generated from it.
Replace the User and Post models in the /schema.zmodel file with the following content:
model User {
    id String @id @default(cuid())
    email String @unique @email
    password String @password @omit @length(8, 16)
    posts Post[]

    // everybody can signup
    @@allow('create,read', true)

    // full access by self
    @@allow('all', auth() == this)
}

model Post {
    id String @id @default(cuid())
    createdAt DateTime @default(now())
    updatedAt DateTime @updatedAt
    title String @length(1, 256)
    published Boolean @default(false)
    author User? @relation(fields: [authorId], references: [id])
    authorId String? @default(auth().id)

    // allow read for all signin users
    @@allow('read', auth() != null && published)

    // full access by author
    @@allow('all', author == auth())
}
The "authorId" field as a @default() attribute with auth().id value. The field will be automatically assigned with the current user's ID when creating a new record. See here for more details.
@passwordis a ZenStack attribute that marks a field to be hashed (using bcryptjs) before saving.@omitindicates the field should be dropped when returned from a query.
By default, all operations are denied for a model. You can use the @@allow attribute to open up some permissions.
@@allow takes two parameters, the first is operation: create/read/update/delete. You can use a comma separated string to pass multiple operations, or use 'all' to abbreviate all operations. The second parameter is a boolean expression that verdicts if the rule should be activated.
Similarly, @@deny can be used to explicitly turn off some operations. It has the same syntax as @@allow but the opposite effect.
Whether an operation is permitted is determined as follows:
- If any
@@denyrule evaluates to true, it's denied. - If any
@@allowrule evaluates to true, it's allowed. - Otherwise, it's denied.
Check out Understanding Access Policies for more details.
Now run zenstack generate and prisma db push to flush the changes to the Prisma schema and database:
npx zenstack generate && npx prisma db push
4. Install a few extra dependencies
npm add jsonwebtoken bcryptjs
npm add -D @types/jsonwebtoken @types/bcryptjs
5. Set up environment variables
Create a ".env" file under the root directory of your project and add the following content:
JWT_SECRET=abc123
In a real-world application, you should use a strong secret.
6. Create database and auth utilities
Create a /src/lib/db.ts file with the following content:
import { PrismaClient } from '@prisma/client';
export const prisma = new PrismaClient();
Create a /src/lib/auth.ts file with the following content:
import { env } from '$env/dynamic/private';
import type { User } from '@prisma/client';
import jwt from 'jsonwebtoken';

export const JWT_TOKEN_COOKIE_NAME = 'ZenStack-Blog-Token';

export function createToken(user: User) {
	return jwt.sign(
		{
			sub: user.id,
			email: user.email
		},
		env.JWT_SECRET,
		{ expiresIn: '7d' }
	);
}
7. Create a signup page
For real-world applications you should usually use a framework or service instead of building your own authentication solution. But since authentication is not the focus of this guide, we'll just implement a minimal email/password-based auth.
Create a /src/routes/signup/+page.svelte file with the following content:
<script lang="ts">
    import { enhance } from '$app/forms';
    import type { ActionData } from './$types';
    export let form: ActionData;
</script>

<div class="flex min-h-screen flex-col items-center justify-center bg-gradient-to-b from-[#2e026d] to-[#15162c]"
>
    <h1 class="text-5xl font-extrabold text-white">Sign up</h1>
    <form class="mt-16 flex flex-col gap-8 text-2xl" method="post" use:enhance>
        {#if form?.dup}
            <p class="text-red-600 my-2">Email aready registered!</p>
        {/if}
        <div>
            <label for="email" class="inline-block w-32 text-white"> Email </label>
            <input
                id="email"
                name="email"
                type="email"
                value={form?.email ?? ''}
                class="ml-4 w-72 rounded border p-2"
            />
        </div>
        <div>
            <label for="password" class="inline-block w-32 text-white"> Password </label>
            <input id="password" name="password" type="password" class="ml-4 w-72 rounded border p-2" />
        </div>
        <input
            type="submit"
            value="Create account"
            class="cursor-pointer rounded border border-gray-500 py-4 text-white"
        />
        <div class="mt-2 text-base font-medium text-gray-300">
            Already have an account?{' '}
            <a href="/signin" class="text-primary-700 underline"> Login here </a>
        </div>
    </form>
</div>
Then create its server-side form handler /src/routes/signup/+page.server.ts with the following content:
import { createToken, JWT_TOKEN_COOKIE_NAME } from '$lib/auth';
import { fail, redirect, type Actions } from '@sveltejs/kit';
import { isPrismaClientKnownRequestError, enhance } from '@zenstackhq/runtime';
import { prisma } from '../../lib/db';

export const actions = {
    default: async ({ request, cookies }) => {
        const data = await request.formData();
        const email = data.get('email');
        const password = data.get('password');

        if (typeof email !== 'string' || typeof password !== 'string') {
            return fail(400, { email, password, missing: true });
        }

        const db = enhance(prisma);

        try {
            // create the user together with a default space
            const user = await db.user.create({
                data: {
                    email,
                    password
                }
            });

            // sign a JWT token and set it as a cookie
            const token = createToken(user);
            cookies.set(JWT_TOKEN_COOKIE_NAME, token, {
                httpOnly: true,
                expires: new Date(Date.now() + 7 * 24 * 60 * 60 * 1000),
                path: '/'
            });
        } catch (err) {
            if (isPrismaClientKnownRequestError(err) && err.code === 'P2002') {
                // duplicated email
                return fail(400, { email, password, dup: true });
            } else {
                throw err;
            }
        }

        throw redirect(303, `/`);
    }
} satisfies Actions;
Now start the dev server by running:
npm run dev
Hit http://localhost:5173/signup and you should see the signup page like:
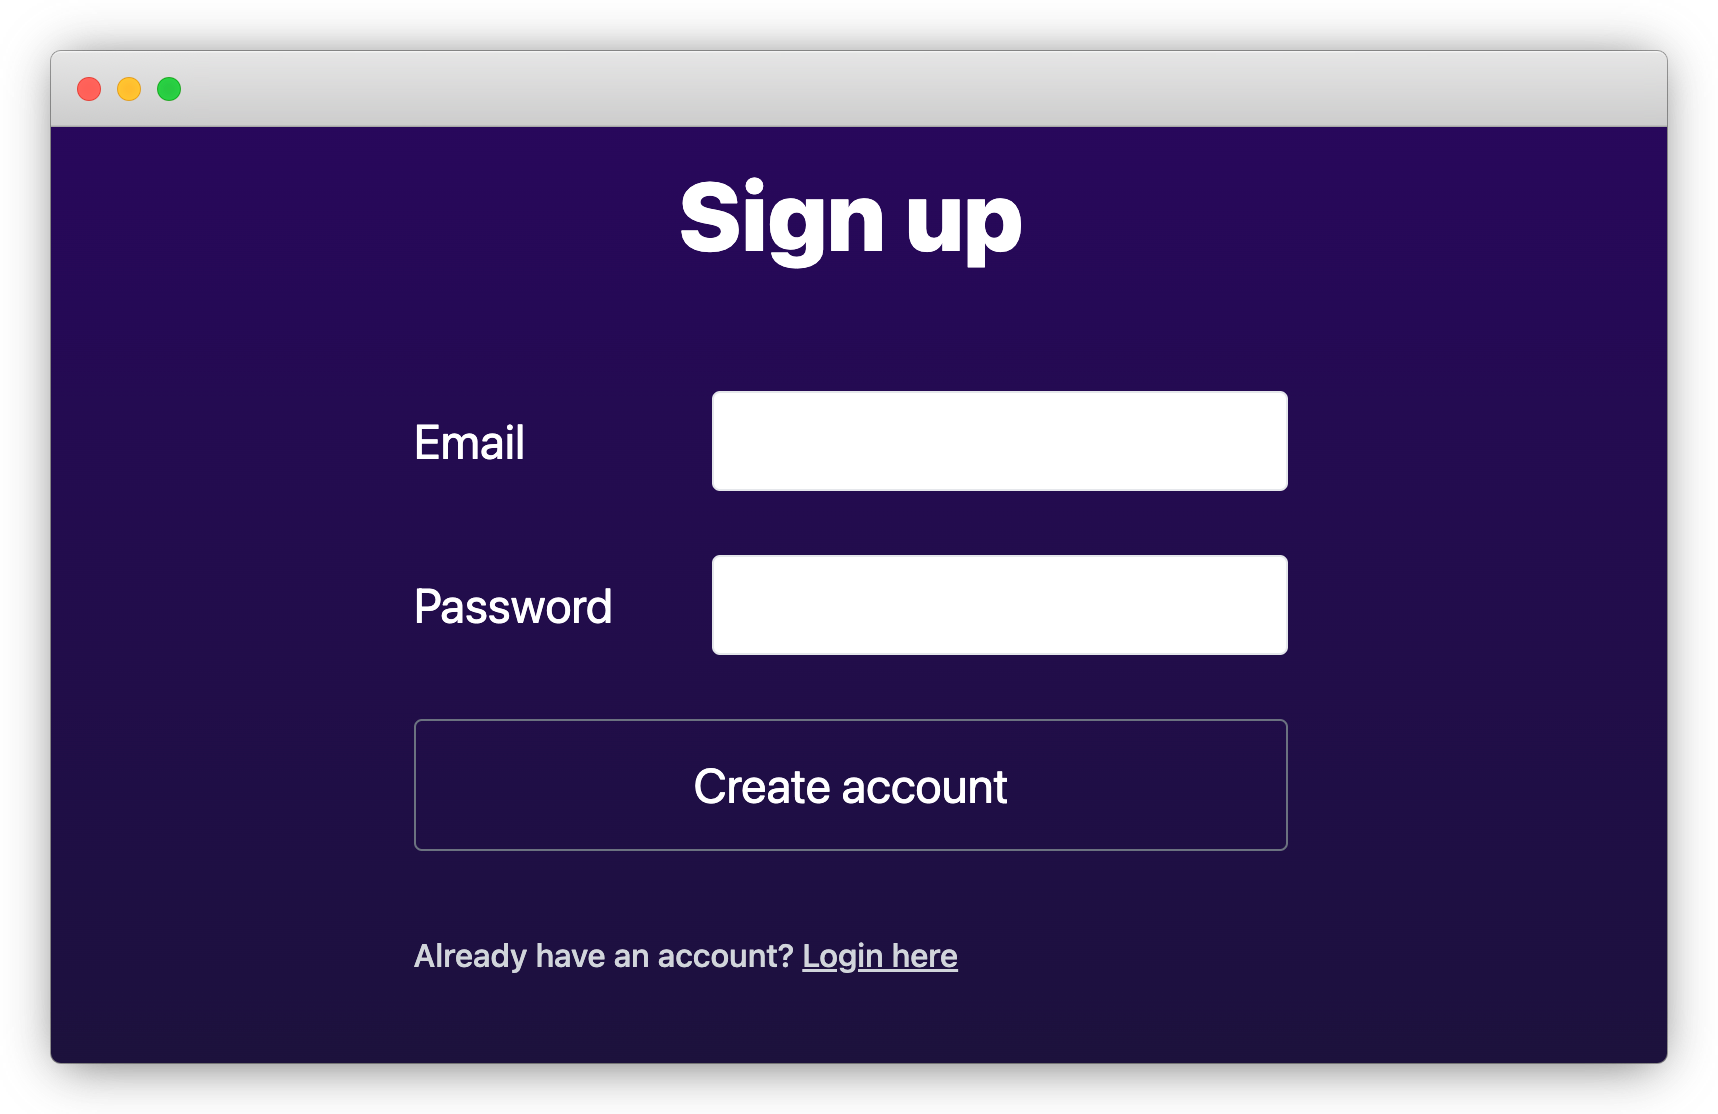
Create an account to continue.
8. Create a signin page
Create a /src/routes/signin/+page.svelte file with the following content:
<script lang="ts">
	import { enhance } from '$app/forms';
	import type { ActionData } from '../signin/$types';

	export let form: ActionData;
</script>

<div class="flex min-h-screen flex-col items-center justify-center bg-gradient-to-b from-[#2e026d] to-[#15162c]"
>
    <h1 class="text-5xl font-extrabold text-white">Login</h1>
    <form class="mt-16 flex flex-col gap-8 text-2xl" method="post" use:enhance>
        {#if form?.invalid}
            <p class="text-red-600 my-2">Invalid credentials</p>
        {/if}
        <div>
            <label for="email" class="inline-block w-32 text-white"> Email </label>
            <input
                id="email"
                name="email"
                type="email"
                value={form?.email ?? ''}
                class="ml-4 w-72 rounded border p-2"
            />
        </div>
        <div>
            <label for="password" class="inline-block w-32 text-white"> Password </label>
            <input id="password" name="password" type="password" class="ml-4 w-72 rounded border p-2" />
        </div>
        <input
            type="submit"
            value="Sign in to my account"
            class="cursor-pointer rounded border border-gray-500 py-4 text-white"
        />
        <div class="mt-2 text-base font-medium text-gray-300">
            Don't have an account yet?{' '}
            <a href="/signup" class="text-primary-700 underline"> Signup here </a>
        </div>
    </form>
</div>
Then create its server-side form handler /src/routes/signin/+page.server.ts with the following content:
import { JWT_TOKEN_COOKIE_NAME, createToken } from '$lib/auth';
import { prisma } from '$lib/db';
import { fail, redirect, type Actions } from '@sveltejs/kit';
import bcrypt from 'bcryptjs';

export const actions = {
    default: async ({ request, cookies }) => {
        const data = await request.formData();

        const email = data.get('email');
        const password = data.get('password');

        if (typeof email !== 'string' || typeof password !== 'string') {
            return fail(400, { email, password, missing: true });
        }

        const user = await prisma.user.findFirst({
            where: { email }
        });
        if (!user || !bcrypt.compareSync(password, user.password)) {
            return fail(401, { email, password, invalid: true });
        }

        const token = createToken(user);
        cookies.set(JWT_TOKEN_COOKIE_NAME, token, {
            httpOnly: true,
            expires: new Date(Date.now() + 7 * 24 * 60 * 60 * 1000),
            path: '/'
        });
        throw redirect(303, `/`);
    }
} satisfies Actions;
Hit http://localhost:5173/signin and you should see the signin page like:
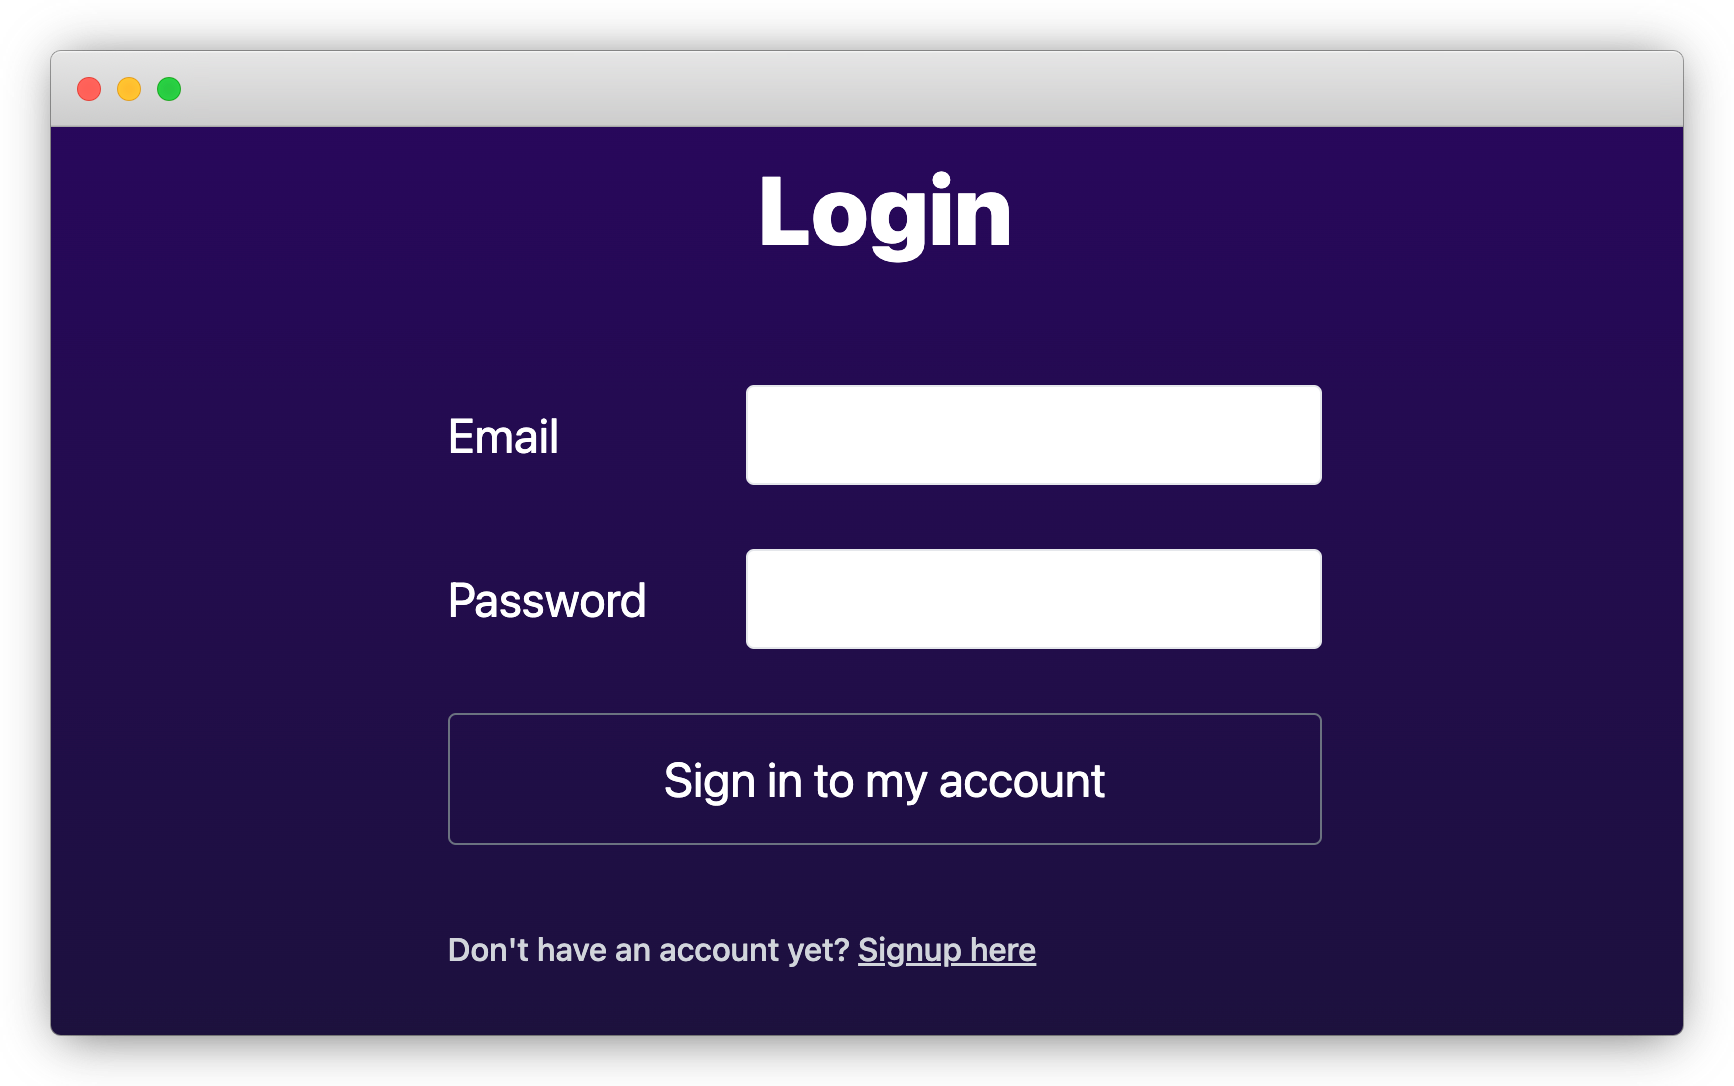
Try signing in with the account you just created.
9. Create a server hook to add user and his corresponding db to context
Use a server hook to intercept requests, extract JWT token and decode it to user identity, create an access-policy-aware Prisma wrapper with the identity, and add both the user and db to the request context. When building the rest of pages in our app, we can fetch them directly from the locals context.
First, update /src/app.d.ts to include user and db fields in the request context's typing:
import type { PrismaClient, User } from '@prisma/client';

declare global {
    namespace App {
        interface Locals {
            user?: User;
            db: PrismaClient;
        }
    }
}

export {};
Then create server hooks /src/hooks.server.ts:
import { env } from '$env/dynamic/private';
import { JWT_TOKEN_COOKIE_NAME } from '$lib/auth';
import { prisma } from '$lib/db';
import type { Handle } from '@sveltejs/kit';
import { enhance } from '@zenstackhq/runtime';
import jwt from 'jsonwebtoken';

const auth = (async ({ event, resolve }) => {
    const token = event.cookies.get(JWT_TOKEN_COOKIE_NAME);
    if (token) {
        try {
            const decoded = jwt.verify(token, env.JWT_SECRET);
            const user = await prisma.user.findUnique({
                where: { id: decoded.sub as string }
            });
            if (user) {
                event.locals.user = user;
            } else {
                console.warn('User not found:', decoded.sub);
                event.cookies.delete(JWT_TOKEN_COOKIE_NAME, { path: '/' });
            }
        } catch {
            event.cookies.delete(JWT_TOKEN_COOKIE_NAME, { path: '/' });
        }
    }

    // create an enhanced PrismaClient that recognizes access policies
    event.locals.db = enhance(prisma, {
        user: event.locals.user ? { id: event.locals.user.id } : undefined
    });

    return resolve(event);
}) satisfies Handle;

export const handle = auth;
10. Build the post list page
Finally we've got to build the main page of our app. For the sake of simplicity, we'll just put all UI directly in the page without further extracting components.
Replace /src/routes/+page.svelte with the following content:
<script lang="ts">
    import { enhance } from '$app/forms';
    import type { ActionData, PageData } from './$types';

    export let data: PageData;
    export let form: ActionData;
</script>

<main class="flex flex-col min-h-screen items-center justify-center gap-12 px-4 py-16 text-white bg-gradient-to-b from-[#2e026d] to-[#15162c]"
>
    <h1 class="text-5xl font-extrabold">My Awesome Blog</h1>

    {#if data.user}
        <div class="flex flex-col">
            <div class="flex gap-4">
                <h3 class="text-lg">Welcome back, {data.user.email}</h3>
                <form method="post" action="?/signOut">
                    <button type="submit" class="text-gray-300 underline">Sign out</button>
                </form>
            </div>

            <section class="mt-10 container flex flex-col text-white">
                <!-- create post -->
                <form method="post" action="?/create" use:enhance>
                    <input
                        name="title"
                        type="text"
                        placeholder="Post title"
                        required
                        class="text-lg text-black px-4 py-2 rounded mr-2"
                    />
                    <button class="rounded border border-white px-4 py-2 text-lg" type="submit"
                        >+ Create</button
                    >
                </form>

                <!-- post list -->
                <ul class="container mt-8 flex flex-col gap-2">
                    {#each data.posts as post (post.id)}
                        <li class="flex items-end justify-between gap-4">
                            <!-- post info -->
                            <p class={`text-2xl ${!post.published ? 'text-gray-400' : ''}`}>
                                {post.title}
                                <span class="text-lg"> by {post.author.email}</span>
                            </p>

                            <!-- post management -->
                            <div class="flex w-32 justify-end gap-1 text-left">
                                <form method="post" action="?/togglePublish" use:enhance>
                                    <input type="hidden" name="id" value={post.id} />
                                    <button class="underline" type="submit">
                                        {post.published ? 'Unpublish' : 'Publish'}
                                    </button>
                                </form>
                                <form method="post" action="?/delete" use:enhance>
                                    <input type="hidden" name="id" value={post.id} />
                                    <button class="underline" type="submit">Delete</button>
                                </form>
                            </div>
                        </li>
                    {/each}
                </ul>

                {#if form?.error}
                    <p class="text-red-500 mt-4">{form.error}</p>
                {/if}
            </section>
        </div>
    {:else}
        <div class="flex gap-4 text-2xl">
            <a href="/signin" class="rounded-lg border px-4 py-2">Signin</a>
            <a href="/signup" class="rounded-lg border px-4 py-2">Signup</a>
        </div>
    {/if}
</main>
Then create a /src/routes/+page.server.ts file to handle page data loading and form actions:
import type { PageServerLoad } from './$types';
import { fail, type Actions, redirect } from '@sveltejs/kit';
import { JWT_TOKEN_COOKIE_NAME } from '$lib/auth';

export const load: PageServerLoad = async ({ locals }) => {
    const posts = await locals.db.post.findMany({ include: { author: true } });
    return {
        user: locals.user,
        posts
    };
};

export const actions: Actions = {
    create: async ({ request, locals }) => {
        const data = await request.formData();
        const title = data.get('title');
        if (typeof title !== 'string') {
            return fail(400, { missing: true });
        }

        await locals.db.post.create({ data: { title } });

        return { success: true };
    },

    togglePublish: async ({ request, locals }) => {
        const data = await request.formData();
        const postId = data.get('id');
        if (typeof postId !== 'string') {
            return fail(400, { missing: true });
        }

        const post = await locals.db.post.findUnique({ where: { id: postId } });
        if (!post) {
            return fail(404, { notFound: true });
        }

        try {
            await locals.db.post.update({ where: { id: postId }, data: { published: !post.published } });
            return { success: true };
        } catch (err) {
            // error can be thrown for reasons like access policy violation
            return { error: `${err}` };
        }
    },

    delete: async ({ request, locals }) => {
        const data = await request.formData();
        const postId = data.get('id');
        if (typeof postId !== 'string') {
            return fail(400, { missing: true });
        }

        try {
            await locals.db.post.delete({ where: { id: postId } });
            return { success: true };
        } catch (err) {
            // error can be thrown for reasons like access policy violation
            return { error: `${err}` };
        }
    },

    signOut: async ({ cookies }) => {
        cookies.delete(JWT_TOKEN_COOKIE_NAME);
        throw redirect(303, '/signin');
    }
};
⚡️ Here's the important thing:
As you can see, our server-side code doesn't contain any authorization logic. Yet our backend is still secure thanks to the access policies we defined in schema.zmodel. The enhanced Prisma client (fetched from locals.db) enforces that necessary filters and checks are injected when calling into the underlying Prisma client. Your ZModel is the single source of truth for access control.
Verifying the result
Now our app is complete and let's verify the result. Create two posts with your current account, and publish one of them:
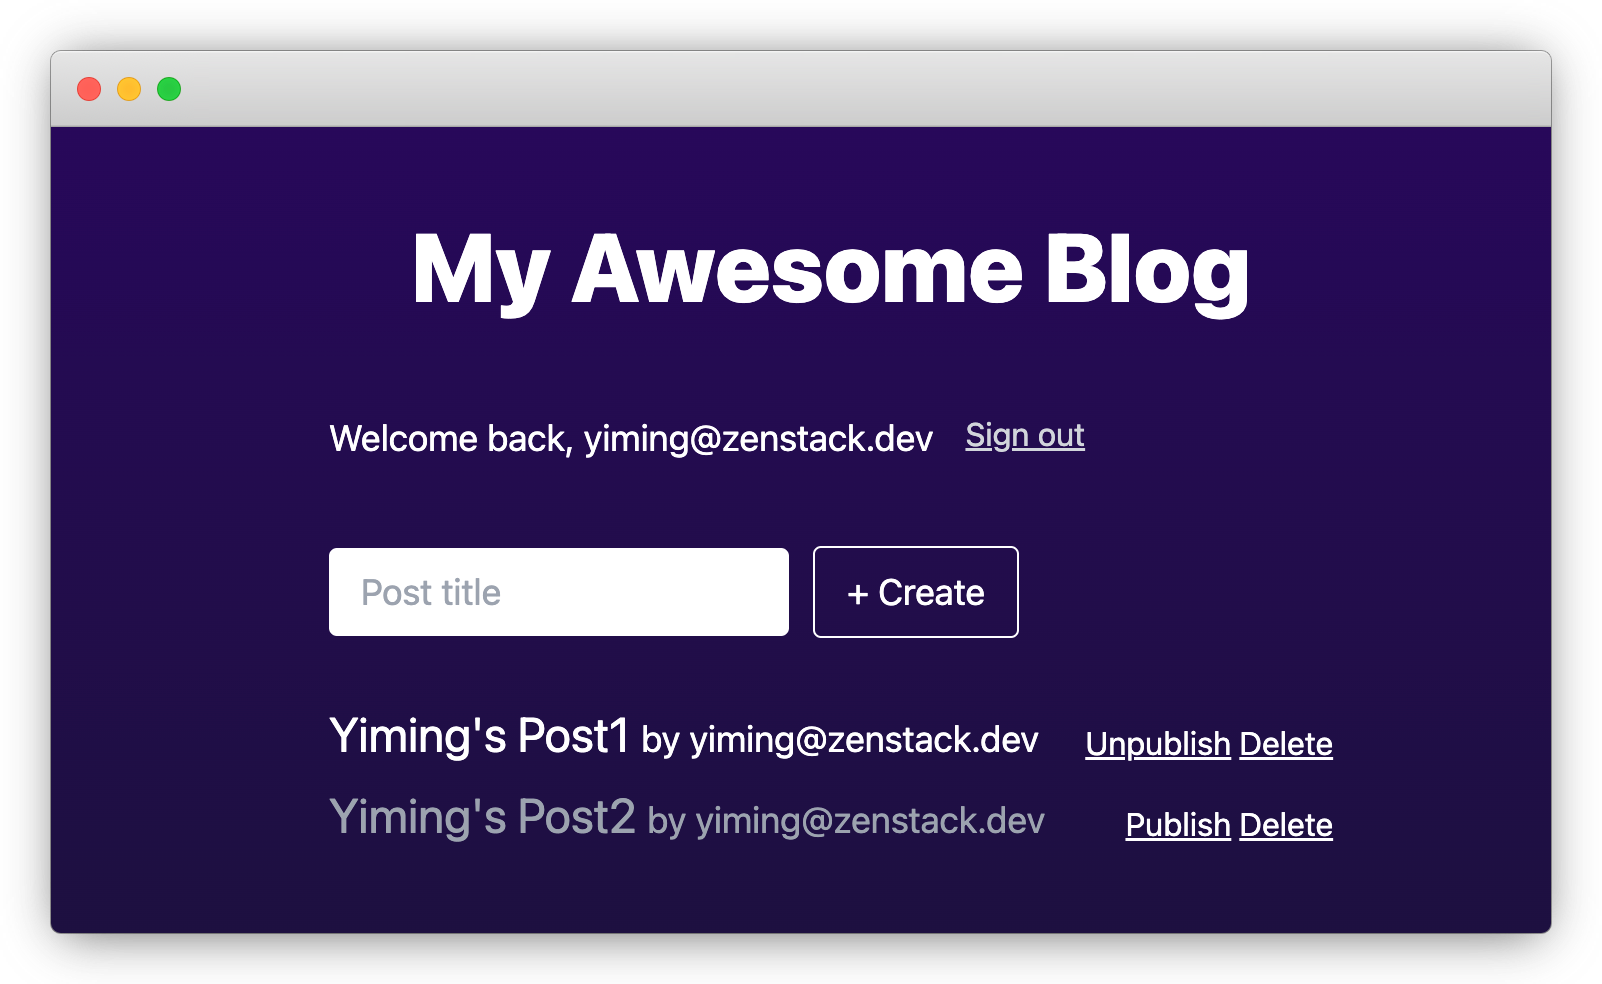
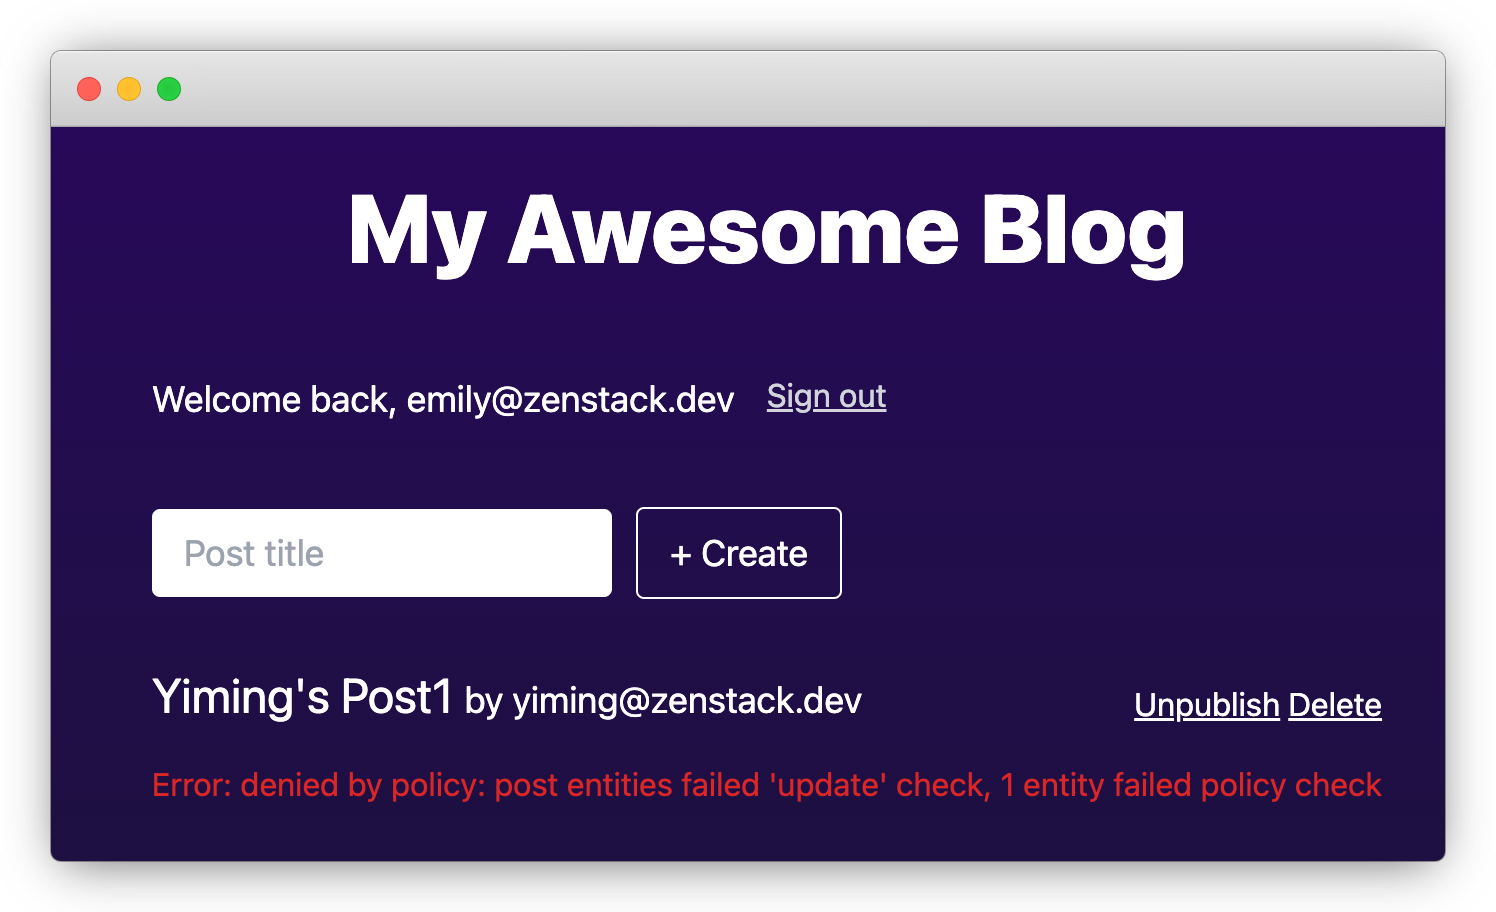
Now, open a new incognito window and sign up a new account emily@zenstack.dev. "Post1" should appear in her list, since our access policy allows all users to read published posts.
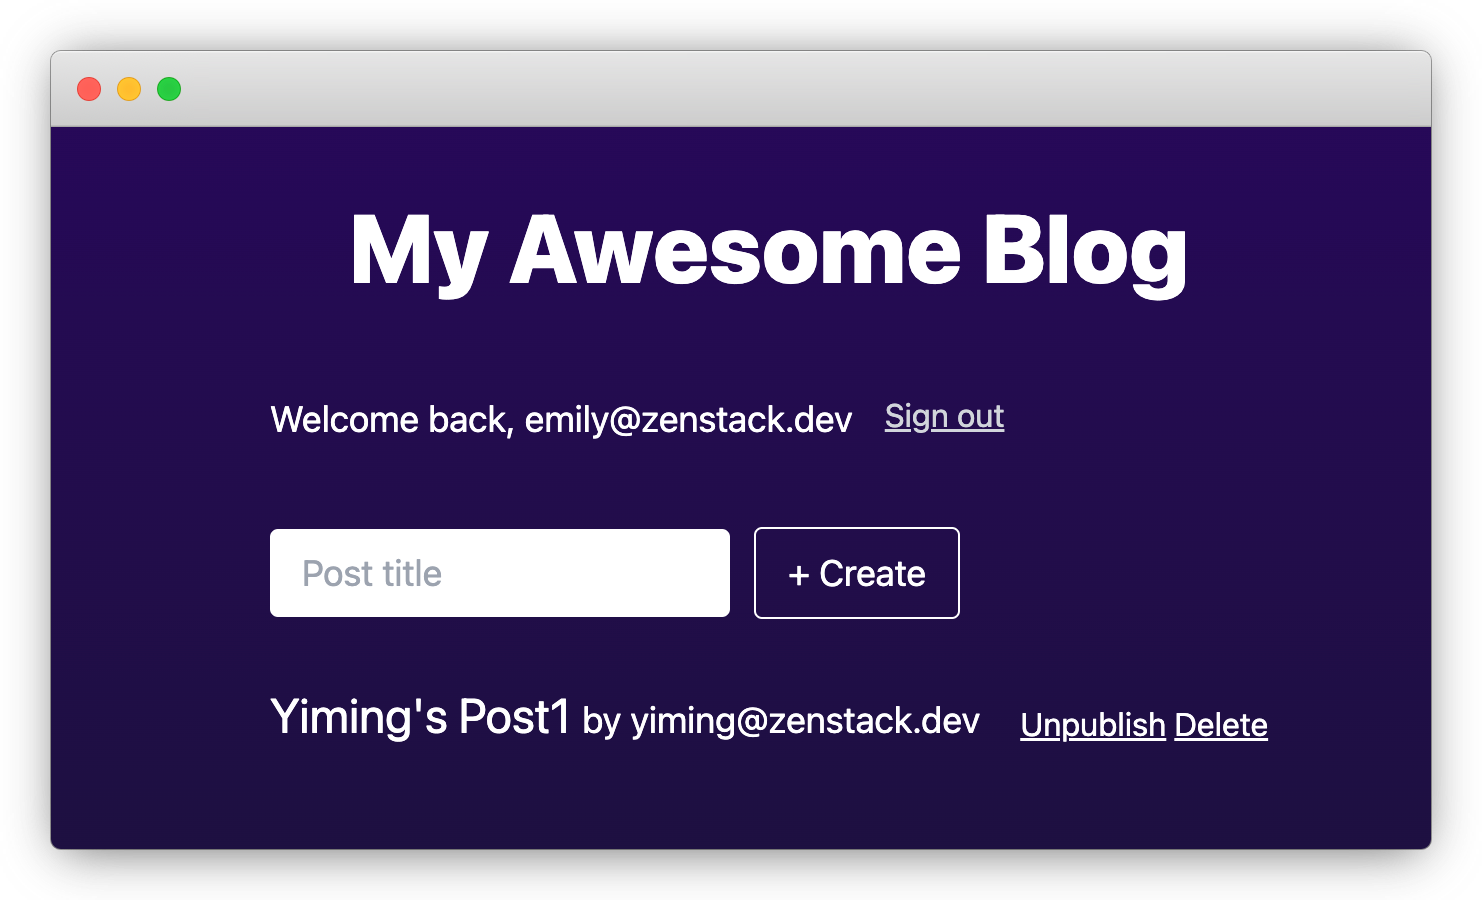
We didn't do any UI blocking to prevent Emily from unpublishing or deleting other people's posts; however, if she tries to do so, the operation will be rejected by the server-side code:
In a real application you can catch the error and render a proper message to the user.
Wrap up
🎉 Congratulations! You've made a simple but secure blogging app without writing any authorization logic. Pretty cool, isn't it?
In this tutorial, we used ZenStack only on the SSR side (loader and actions) of SvelteKit, but its power doesn't stop there. There're two more things worth your attention that enable more advanced scenarios:
-
The
@zenstackhq/server/sveltekitserver adapter provides a SvelteKit hooks handler that installs an automatic CRUD API for database operations. -
The
@zenstackhq/tanstack-queryplugin provides automatic generation of client-side query and mutation hooks for consuming the afore-mentioned CRUD API.
These two features combined allow you to build a typical SPA (CSR + API). You can also freely mix and match SSR and CSR as you wish.
If you have trouble following the building process, you can find the final result here. For more details about ZenStack, please refer to the Reference and Recipes parts of the documentation.
Have fun building cool stuff 🚀!