Get Started With Next.js
Let's have some fun by creating a simple blogging app. You'll see how effortless it is to have a secure backend service without actually coding it.
You can find the final build result here.
Requirements
Our target app should meet the following requirements:
- Email/password-based signin/signup.
- Users can create posts for themselves.
- Post owners can update/publish/unpublish/delete their own posts.
- Users cannot make changes to posts that do not belong to them.
- Published posts can be viewed by all logged-in users.
Let's get started 🚀.
Prerequisite
- Make sure you have Node.js 18 or above installed.
- Install the VSCode extension for editing data models.
Building the app
1. Create a new project
The easiest way to create a Next.js project with boilerplates is with create-t3-app. Run the following command to create a new project with Prisma, NextAuth and TailwindCSS.
npx create-t3-app@7.39.3 --prisma --nextAuth --tailwind --CI my-blog-app
cd my-blog-app
Remove DISCORD_CLIENT_ID and DISCORD_CLIENT_SECRET related code from src/env.js, since we're not going to use Discord for authentication. After that, start the dev server:
npm run dev
If everything works, you should have a running Next.js app at http://localhost:3000.
2. Initialize the project for ZenStack
Let's run the zenstack CLI to prepare your project for using ZenStack.
npx zenstack@latest init
The command installs a few NPM dependencies. If the project already has a Prisma schema at prisma/schema.prisma, it's copied over to schema.zmodel. Otherwise, a sample schema.zmodel file is created.
Moving forward, you will keep updating schema.zmodel file, and prisma/schema.prisma will be automatically generated from it.
3. Preparing the User model for authentication
First, in schema.zmodel, make a few changes to the User model:
model User {
  id            String    @id @default(cuid())
  name          String?
  email         String?   @unique
  emailVerified DateTime?
  password      String @password @omit
  image         String?
  accounts      Account[]
  sessions      Session[]
  posts         Post[]

  // everyone can signup, and user profile is also publicly readable
  @@allow('create,read', true)

  // only the user can update or delete their own profile
  @@allow('update,delete', auth() == this)
}
For simplicity, we'll use username/password-based authentication in this project. In the code above,
we added a password field to support it, together with two access policy rules to control the
permissions of this model.
@passwordis a ZenStack attribute that marks a field to be hashed (using bcryptjs) before saving.@omitindicates the field should be dropped when returned from a query.
By default, all operations are denied for a model. You can use the @@allow attribute to open up some permissions.
@@allow takes two parameters, the first is operation: create/read/update/delete. You can use a comma separated string to pass multiple operations, or use 'all' to abbreviate all operations. The second parameter is a boolean expression that verdicts if the rule should be activated.
Similarly, @@deny can be used to explicitly turn off some operations. It has the same syntax as @@allow but the opposite effect.
Whether an operation is permitted is determined as follows:
- If any
@@denyrule evaluates to true, it's denied. - If any
@@allowrule evaluates to true, it's allowed. - Otherwise, it's denied.
Check out Understanding Access Policies for more details.
Now run zenstack generate and prisma db push to flush the changes to the Prisma schema and database:
npx zenstack generate && npx prisma db push
4. Configure NextAuth to use credential-based auth
First, we need to install type definitions for bcryptjs
npm install --save @types/bcryptjs
Now let's update /src/server/auth/config.ts to the content below to
use credentials auth and JWT-based session:
import { PrismaAdapter } from '@auth/prisma-adapter';
import { type PrismaClient } from '@prisma/client';
import { type DefaultSession, type NextAuthConfig } from 'next-auth';
import { compare } from 'bcryptjs';
import CredentialsProvider from 'next-auth/providers/credentials';
import { db } from '~/server/db';

/**
 * Module augmentation for `next-auth` types. Allows us to add custom properties to the `session`
 * object and keep type safety.
 *
 * @see https://next-auth.js.org/getting-started/typescript#module-augmentation
 */
declare module 'next-auth' {
    interface Session extends DefaultSession {
        user: {
            id: string;
        };
    }
}

/**
 * Options for NextAuth.js used to configure adapters, providers, callbacks, etc.
 *
 * @see https://next-auth.js.org/configuration/options
 */
export const authConfig = {
    session: {
        strategy: 'jwt',
    },
    providers: [
        CredentialsProvider({
            credentials: {
                email: { type: 'email' },
                password: { type: 'password' },
            },
            authorize: authorize(db),
        }),
    ],
    adapter: PrismaAdapter(db),
    callbacks: {
        session: ({ session, token }) => {
            if (session.user) {
                // eslint-disable-next-line @typescript-eslint/no-non-null-assertion
                session.user.id = token.sub!;
            }
            return session;
        },
    },
} satisfies NextAuthConfig;

function authorize(prisma: PrismaClient) {
    return async (credentials: Partial<Record<'email' | 'password', unknown>> | undefined) => {
        if (!credentials) {
            throw new Error('Missing credentials');
        }

        if (typeof credentials.email !== 'string') {
            throw new Error('"email" is required in credentials');
        }

        if (typeof credentials.password !== 'string') {
            throw new Error('"password" is required in credentials');
        }
        const maybeUser = await prisma.user.findFirst({
            where: { email: credentials.email },
            select: { id: true, email: true, password: true },
        });
        if (!maybeUser?.password) return null;
        // verify the input password with stored hash
        const isValid = await compare(credentials.password, maybeUser.password);

        if (!isValid) return null;
        return { id: maybeUser.id, email: maybeUser.email };
    };
}
5. Mount CRUD service & generate hooks
ZenStack has built-in support for Next.js and can provide database CRUD services automagically, so you don't need to write it yourself.
First install the @zenstackhq/server, @tanstack/react-query, and @zenstackhq/tanstack-query packages:
npm install @zenstackhq/server@latest @zenstackhq/tanstack-query@latest @tanstack/react-query
Let's mount it to the /api/model/[...path] endpoint. Create a /src/pages/api/model/[...path].ts
file and fill in the content below:
import { enhance } from '@zenstackhq/runtime';
import { NextRequestHandler } from '@zenstackhq/server/next';
import { db } from '~/server/db';
import { auth } from '~/server/auth';

// create an enhanced Prisma client with user context
async function getPrisma() {
    const authObj = await auth();
    return enhance(db, { user: authObj?.user });
}

const handler = NextRequestHandler({ getPrisma, useAppDir: true });

export { handler as DELETE, handler as GET, handler as PATCH, handler as POST, handler as PUT };
The /api/model route is now ready to access database query and mutation requests.
However, manually calling the service will be tedious. Fortunately, ZenStack can
automatically generate React hooks for you.
Let's enable it by adding the following snippet at the top level to schema.zmodel:
plugin hooks {
  provider = '@zenstackhq/tanstack-query'
  target = 'react'
  version = 'v5'
  output = "./src/lib/hooks"
}
Now run zenstack generate again; you'll find the hooks generated under /src/lib/hooks folder:
npx zenstack generate
Now we're ready to implement the signup/signin flow.
6. Implement Signup/Signin
First, NextAuth and React Query require context providers to be set up. Let's add it to /src/pages/_app.tsx:
import { type AppType } from "next/app";
import { type Session } from "next-auth";
import { SessionProvider } from "next-auth/react";
import { QueryClient, QueryClientProvider } from "@tanstack/react-query";

import "../styles/globals.css";

const queryClient = new QueryClient();

const MyApp: AppType<{ session: Session | null }> = ({
  Component,
  pageProps: { session, ...pageProps },
}) => {
  return (
    <QueryClientProvider client={queryClient}>
      <SessionProvider session={session}>
        <Component {...pageProps} />
      </SessionProvider>
    </QueryClientProvider>
  );
};

export default MyApp;
Now let's implement the signup/signin pages. First, create a new page /src/pages/signup.tsx:
/* eslint-disable @typescript-eslint/no-explicit-any */
/* eslint-disable @typescript-eslint/no-unsafe-member-access */
import type { NextPage } from "next";
import { signIn } from "next-auth/react";
import Router from "next/router";
import { useState, type FormEvent } from "react";
import { useCreateUser } from "../lib/hooks";

const Signup: NextPage = () => {
  const [email, setEmail] = useState("");
  const [password, setPassword] = useState("");
  const { mutateAsync: signup } = useCreateUser();

  async function onSignup(e: FormEvent) {
    e.preventDefault();
    try {
      await signup({ data: { email, password } });
    } catch (err: any) {
      console.error(err);
      if (err.info?.prisma && err.info?.code === "P2002") {
        // P2002 is Prisma's error code for unique constraint violations
        alert("User alread exists");
      } else {
        alert("An unknown error occurred");
      }
      return;
    }

    // signin to create a session
    await signIn("credentials", { redirect: false, email, password });
    await Router.push("/");
  }

  return (
    <div className="flex min-h-screen flex-col items-center justify-center bg-gradient-to-b from-[#2e026d] to-[#15162c]">
      <h1 className="text-5xl font-extrabold text-white">Sign up</h1>
      <form
        className="mt-16 flex flex-col gap-8 text-2xl"
        onSubmit={(e) => void onSignup(e)}
      >
        <div>
          <label htmlFor="email" className="inline-block w-32 text-white">
            Email
          </label>
          <input
            id="email"
            type="email"
            value={email}
            onChange={(e) => setEmail(e.currentTarget.value)}
            className="ml-4 w-72 rounded border p-2 bg-white"
          />
        </div>
        <div>
          <label htmlFor="password" className="inline-block w-32 text-white">
            Password
          </label>
          <input
            id="password"
            type="password"
            value={password}
            onChange={(e) => setPassword(e.currentTarget.value)}
            className="ml-4 w-72 rounded border p-2 bg-white"
          />
        </div>
        <input
          type="submit"
          value="Create account"
          className="cursor-pointer rounded border border-gray-500 py-4 text-white"
        />
      </form>
    </div>
  );
};

export default Signup;
In the code above, we used the auto-generated useCreateUser hooks to create new User entities.
- The services backing the hooks are governed by the access policies we defined. Here the
createcall can succeed because we explicitly allowed it in theUsermodel. By default, all operations are forbidden. - The
passwordfield is automatically hashed. You can confirm it using a sqlite inspection tool to browse theprisma/db.sqlitedatabase file.
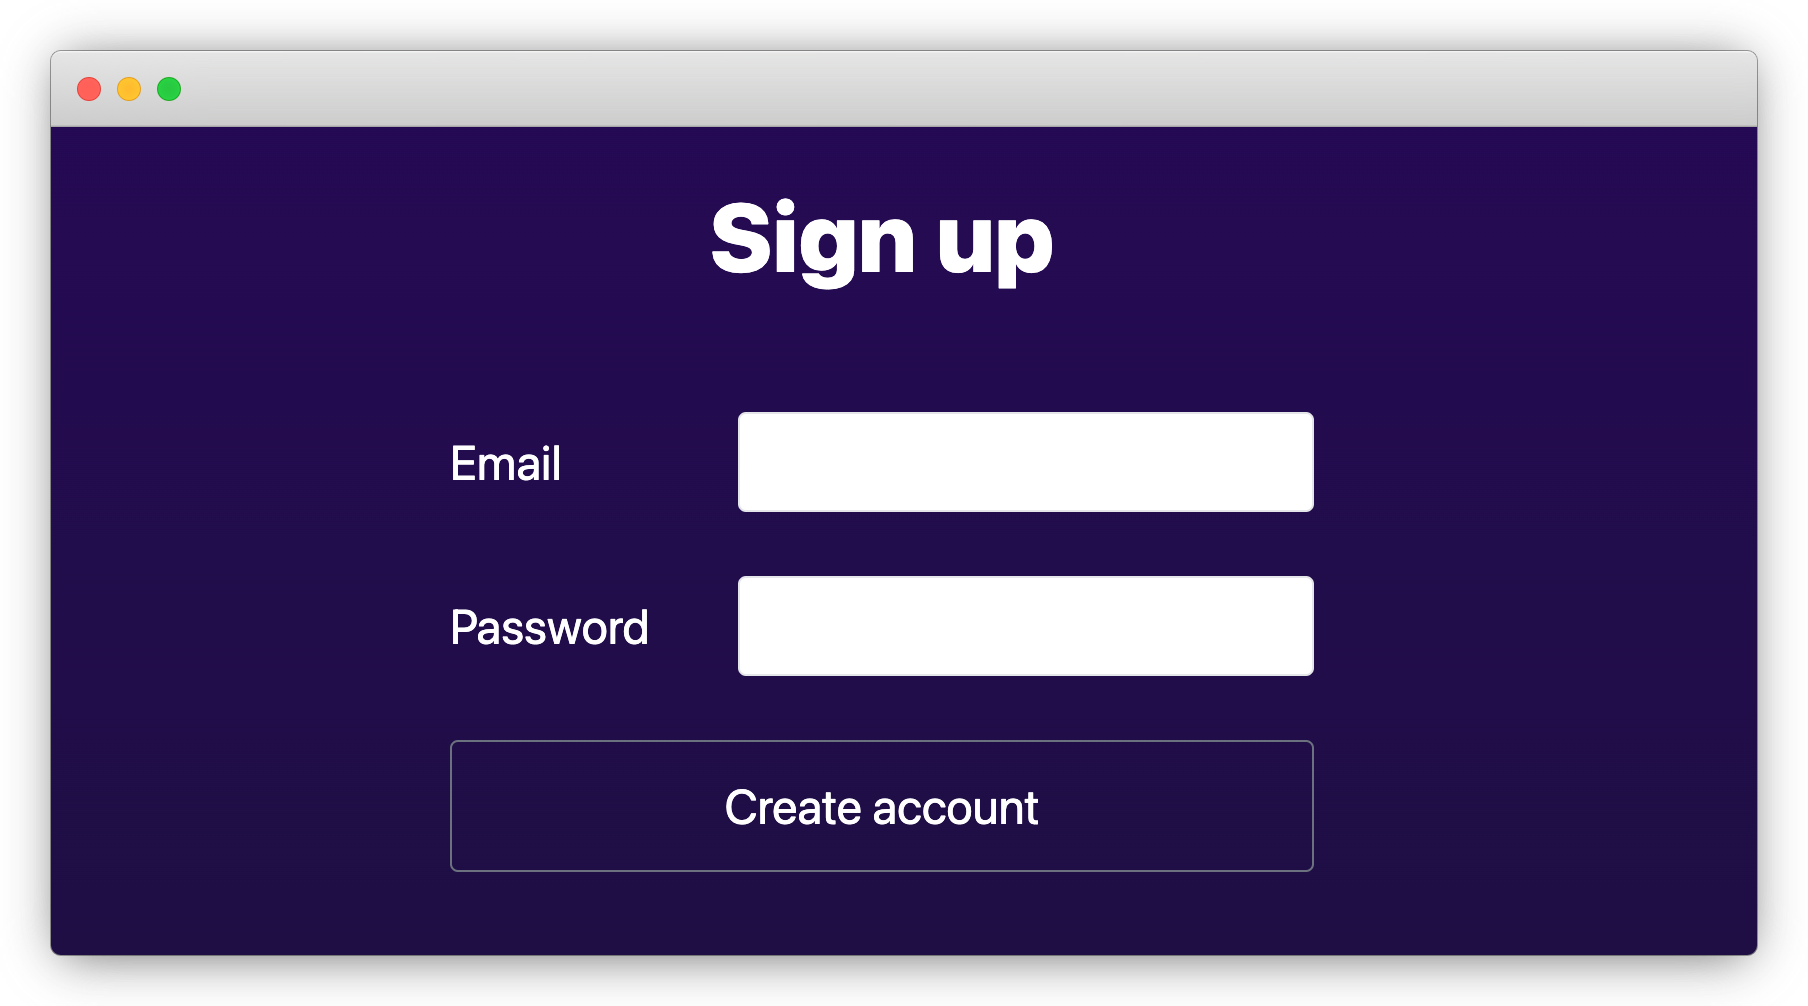
Try visiting http://localhost:3000/signup and creating a new user. It should look like this:
Similarly, create the signin page /src/pages/signin.tsx:
import type { NextPage } from "next";
import { signIn } from "next-auth/react";
import Router from "next/router";
import { useState, type FormEvent } from "react";

const Signin: NextPage = () => {
  const [email, setEmail] = useState("");
  const [password, setPassword] = useState("");

  async function onSignin(e: FormEvent) {
    e.preventDefault();

    const result = await signIn("credentials", {
      redirect: false,
      email,
      password,
    });

    if (result?.ok) {
      await Router.push("/");
    } else {
      alert("Signin failed");
    }
  }

  return (
    <div className="flex min-h-screen flex-col items-center justify-center bg-gradient-to-b from-[#2e026d] to-[#15162c]">
      <h1 className="text-5xl font-extrabold text-white">Login</h1>
      <form
        className="mt-16 flex flex-col gap-8 text-2xl"
        onSubmit={(e) => void onSignin(e)}
      >
        <div>
          <label htmlFor="email" className="inline-block w-32 text-white">
            Email
          </label>
          <input
            id="email"
            type="email"
            value={email}
            onChange={(e) => setEmail(e.currentTarget.value)}
            className="ml-4 w-72 rounded border p-2 bg-white"
          />
        </div>
        <div>
          <label htmlFor="password" className="inline-block w-32 text-white">
            Password
          </label>
          <input
            id="password"
            type="password"
            value={password}
            onChange={(e) => setPassword(e.currentTarget.value)}
            className="ml-4 w-72 rounded border p-2 bg-white"
          />
        </div>
        <input
          type="submit"
          value="Sign me in"
          className="cursor-pointer rounded border border-gray-500 py-4 text-white"
        />
      </form>
    </div>
  );
};

export default Signin;
7. Prepare the Post model
Now let's update the Post model to add access policies.
model Post {
  id Int @id @default(autoincrement())
  name String
  createdAt DateTime @default(now())
  updatedAt DateTime @updatedAt
  published Boolean @default(false)

  createdBy User @relation(fields: [createdById], references: [id])
  createdById String @default(auth().id)

  @@index([name])

  // author has full access
  @@allow('all', auth() == createdBy)

  // logged-in users can view published posts
  @@allow('read', auth() != null && published)
}
The "createdById" field as a @default() attribute with auth().id value. The field will be automatically assigned with the current user's ID when creating a new record. See here for more details.
Don't forget to regenerate and push schema changes to the database:
npx zenstack generate && npx prisma db push
8. Build up the home page
Now let's replace /src/pages/index.tsx with the content below and use it for viewing and managing posts.
import type { Post } from '@prisma/client';
import { type NextPage } from 'next';
import { signOut, useSession } from 'next-auth/react';
import Link from 'next/link';
import Router from 'next/router';
import { useCreatePost, useDeletePost, useFindManyPost, useUpdatePost } from '../lib/hooks';

type AuthUser = { id: string; email?: string | null };

const Welcome = ({ user }: { user: AuthUser }) => {
    async function onSignout() {
        await signOut({ redirect: false });
        await Router.push('/signin');
    }
    return (
        <div className='flex gap-4'>
            <h3 className='text-lg'>Welcome back, {user?.email}</h3>
            <button className='text-gray-300 underline' onClick={() => void onSignout()}>
                Signout
            </button>
        </div>
    );
};

const SigninSignup = () => {
    return (
        <div className='flex gap-4 text-2xl'>
            <Link href='/signin' className='rounded-lg border px-4 py-2'>
                Signin
            </Link>
            <Link href='/signup' className='rounded-lg border px-4 py-2'>
                Signup
            </Link>
        </div>
    );
};

const Posts = () => {
    // Post crud hooks
    const { mutateAsync: createPost } = useCreatePost();
    const { mutateAsync: updatePost } = useUpdatePost();
    const { mutateAsync: deletePost } = useDeletePost();

    // list all posts that're visible to the current user, together with their authors
    const { data: posts } = useFindManyPost({
        include: { createdBy: true },
        orderBy: { createdAt: 'desc' },
    });

    async function onCreatePost() {
        const name = prompt('Enter post name');
        if (name) {
            await createPost({ data: { name } });
        }
    }

    async function onTogglePublished(post: Post) {
        await updatePost({
            where: { id: post.id },
            data: { published: !post.published },
        });
    }

    async function onDelete(post: Post) {
        await deletePost({ where: { id: post.id } });
    }

    return (
        <div className='container flex flex-col text-white'>
            <button className='rounded border border-white p-2 text-lg' onClick={() => void onCreatePost()}>
                + Create Post
            </button>

            <ul className='container mt-8 flex flex-col gap-2'>
                {posts?.map((post) => (
                    <li key={post.id} className='flex items-end justify-between gap-4'>
                        <p className={`text-2xl ${!post.published ? 'text-gray-400' : ''}`}>
                            {post.name}
                            <span className='text-lg'> by {post.createdBy.email}</span>
                        </p>
                        <div className='flex w-32 justify-end gap-1 text-left'>
                            <button className='underline' onClick={() => void onTogglePublished(post)}>
                                {post.published ? 'Unpublish' : 'Publish'}
                            </button>
                            <button className='underline' onClick={() => void onDelete(post)}>
                                Delete
                            </button>
                        </div>
                    </li>
                ))}
            </ul>
        </div>
    );
};

const Home: NextPage = () => {
    const { data: session, status } = useSession();

    if (status === 'loading') return <p>Loading ...</p>;

    return (
        <main className='flex min-h-screen flex-col items-center justify-center bg-gradient-to-b from-[#2e026d] to-[#15162c]'>
            <div className='container flex flex-col items-center justify-center gap-12 px-4 py-16 text-white'>
                <h1 className='text-5xl font-extrabold'>My Awesome Blog</h1>

                {session?.user ? (
                    // welcome & blog posts
                    <div className='flex flex-col'>
                        <Welcome user={session.user} />
                        <section className='mt-10'>
                            <Posts />
                        </section>
                    </div>
                ) : (
                    // if not logged in
                    <SigninSignup />
                )}
            </div>
        </main>
    );
};

export default Home;
Verifying the result
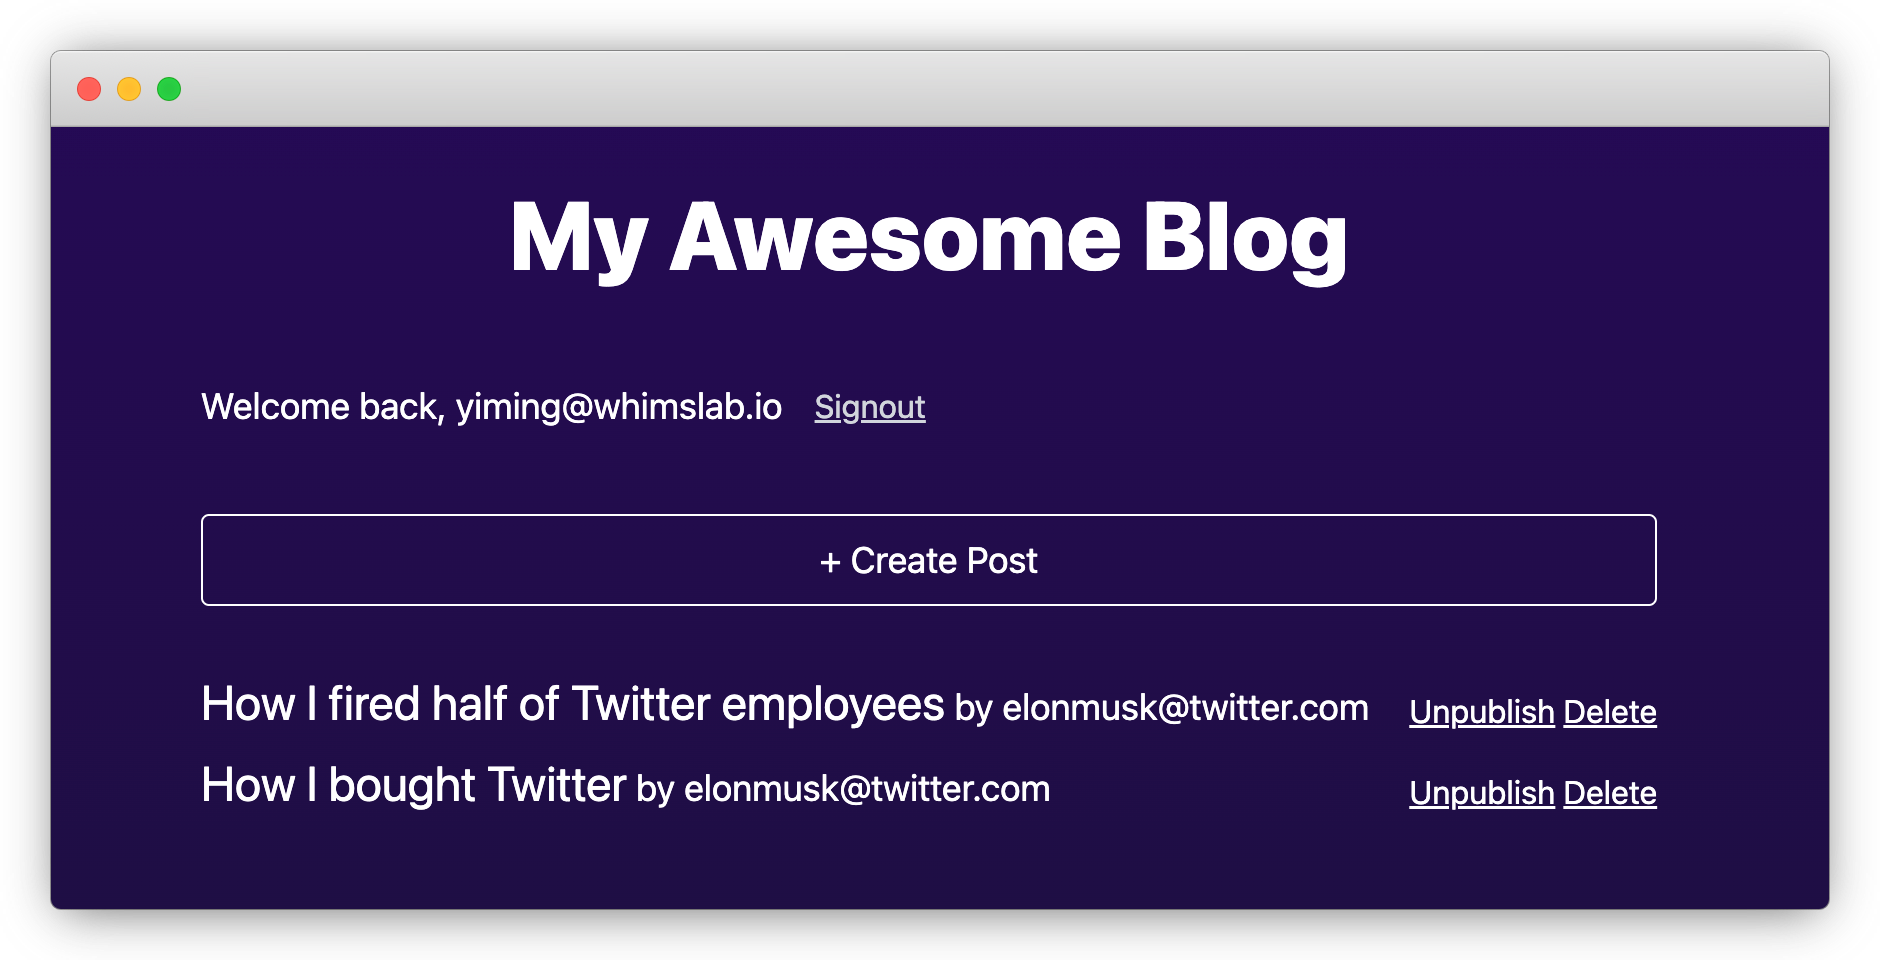
Restart the dev server and try creating a few posts. You should see something like the following:

The code looks a bit long because we tucked all UI components directly into the page.
As you can see, querying and mutating Post entities are fairly straightforward,
the generated hooks. When mutation happens, e.g. a new post is created, data refetching
is also triggered automatically.
Try opening an incognito browser window and signing up for a separate account. You should find that the published posts are visible, as we specified with access policies.
Since we haven't hidden "Unpublish" and "Delete" buttons for posts not owned by the current user, you can still click them even for posts not owned to you, but it will end up with a 403 error:
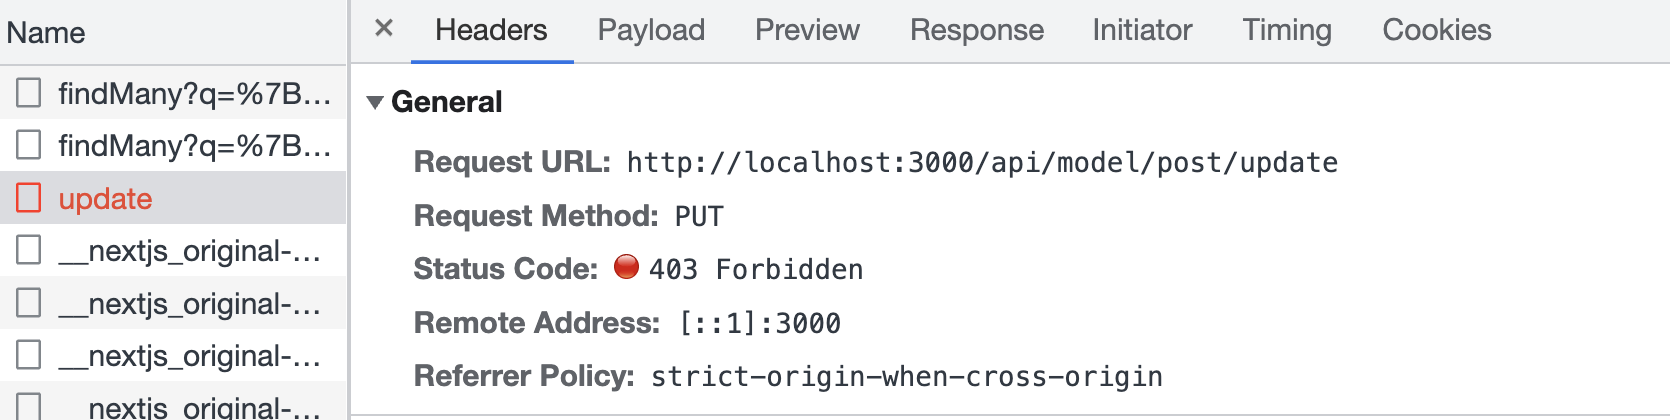
{
    "prisma": true,
    "rejectedByPolicy": true,
    "code": "P2004",
    "message": "denied by policy: post entities failed 'update' check, 1 entities failed policy check"
}
You can catch the error and render a nice message to the user.
Wrap up
🎉 Congratulations! You've made a simple blogging app without writing a single line of backend code. Pretty cool, isn't it?
If you have trouble following the building process, you can find the final result here. For more details about ZenStack, please refer to the Reference and Guides parts of the documentation.
Have fun building cool stuff 🚀!