How to Add Custom Attributes in Prisma

The Prisma schema is intuitive and lets you declare your database tables in a human-readable way. The thing I like most is to be able to use it as the single source of truth for the data models of my application. However, to be able to get that for more cases, there should be a good extension mechanism. Otherwise, Prisma would have to cover all the different cases by itself to achieve that universally.
The most straightforward way to extend it is to use Custom Attribute. Unfortunately, it has not been supported yet and seems not for the foreseeable future. Check out the long history of the issue:
https://github.com/prisma/prisma/issues/3102
Also, the below-related issues:
- Support SQL Check constraints #3388
- Add exclude in the query arguments #5042
- Support adding prefix to an @id field #3391
In the following content, I will show you two ways of adding custom attributes:
- Comments workaround by Prisma (You can skip this part if you already know)
- Custom attributes of ZenStack.
Comments workaround by Prisma
The beauty of the open-source community is as long as there is a requirement, there is always a solution for it. See the solutions given by the community:
model Post {
  id String @id @default(uuid()) /// @zod.uuid()
  /// @zod.max(255, { message: "The title must be shorter than 256 characters" })
  title String
  contents String /// @zod.max(10240)
}
model User {
    id String @id @default(cuid())
    /// @HideField()
    password String
    /// @HideField({ output: true, input: true })
    secret String
    /// @HideField({ match: '@(User|Comment)Create*Input' })
    createdAt DateTime @default(now())
}
They all use triple slash comments to do the trick because these comments will show up in the abstract syntax tree (AST) of the schema file as descriptions of AST nodes. Then they could access it on their own generator. I will give you a brief introduction to how to do that.
How to access the attribute in the generator
In a nutshell, a generator’s code would be called when you run the prisma generate command.
Implement generator
Under the hood, a generator has to be an executable program that implements a JSON PRC interface via stdio. Luckily, Prisma has written a helper library @prisma/generator-helper taking care of the communication of RPC and giving us a simple callback function. All you need to do is to implement the generatorHandler function to create a new generator for yourself like the one below:
import { DMMF, generatorHandler, GeneratorOptions } from '@prisma/generator-helper';
import { getDMMF } from '@prisma/internals';

generatorHandler({
    onManifest: () => ({
        prettyName: 'My Generator',
    }),
    onGenerate: async (options: GeneratorOptions) => {
        const prismaClientDmmf = await getDMMF({
            datamodel: options.datamodel,
        });

        const models: DMMF.Model[] = prismaClientDmmf.datamodel.models;
        console.log(models);
    },
});
Use generator in schema
Then you can use it in the prisma schema as defined:
generator myGenerator {
  // provider is the command to run the generatorHandler function defined above
  provider = "node index.js"
  // the output folder for the generated code
  output   = "./generated"
}
Run generator
After that, run the prisma you should see the output of the “My Generator”:
Prisma schema loaded from prisma/schema.prisma
{
  enums: [],
  models: [
    {
      name: 'User',
      dbName: null,
      fields: [Array],
      primaryKey: null,
      uniqueFields: [],
      uniqueIndexes: [],
      isGenerated: false
    },
    {
      name: 'Post',
      dbName: null,
      fields: [Array],
      primaryKey: null,
      uniqueFields: [],
      uniqueIndexes: [],
      isGenerated: false
    }
  ],
  types: []
}

✔ Generated Prisma Client (4.8.0 | library) to ./node_modules/@prisma/client in 76ms

✔ Generated My Generator to ./prisma/generated in 2.32s
Access attribute
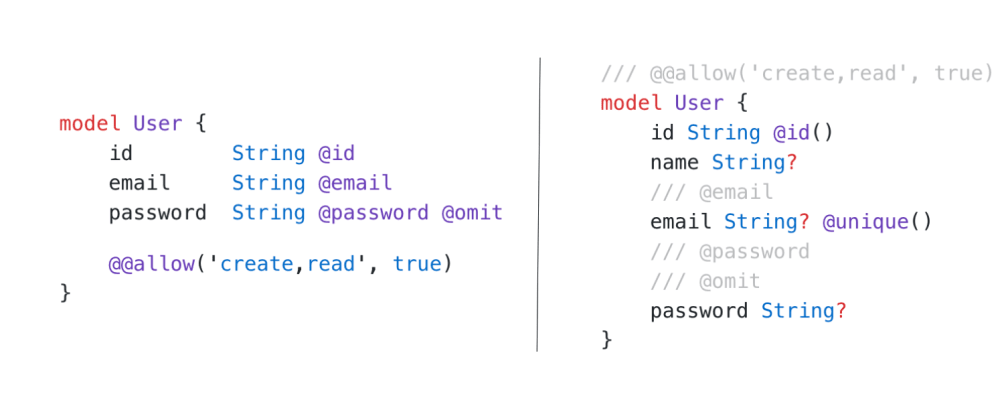
Let’s assume we would like to have some custom attributes:
- An attribute @@allow on model level to control the access policy.
- An attribute @email to make the field validation for email.
- Attributes @password and @omit on the password field to encrypt and ignore it by normal read.
// everyone can signup, and user profile is also publicly readable
/// @@allow('create,read', true)
model User {
    id String @id()
    name String?
    /// @email
    email String? @unique()
    /// @password
    /// @omit
    password String?
}
The triple comments will be set to the documentation property of the AST node, so you can access it as below:
const userModel = datamodel.models.find((model) => model.name === 'User');
console.log(`user model attribute: ${userModel?.documentation}`);

const emailField = userModel?.fields.find((field) => field.name === 'email');
console.log(`email field attribute: ${emailField?.documentation}`);

const passwordField = userModel?.fields.find((field) => field.name === 'password');
console.log(`password field attribute: ${passwordField?.documentation}`);
The output after running would be:
user model attribute: @@allow('create,read', true)
email field attribute: @email
password field attribute: @password
@omit
Issues
Although it worked, using comments has obvious defects:
- There is no syntax checking. It means you don’t know whether you write the correct syntax before you actually run it. I personally have a really bad feeling about it because Type safety is the main reason why I switch to Prisma from TypeORM.
- You have to parse the string of comments to the attribute yourself and also need to consider multiple attributes’ cases like
passwordin the above example. - Two types of attributes exist which is not good for reading.
- You need to be very cautious of not miss use double slash // comments, which would not be present in the AST.
So as Dan Abramov said in the React Documentary:
if you needed something, it didn’t exist, you’d have to write it.
Custom attributes of ZenStack
ZenStack is the toolkit that supercharges Prisma with a powerful access control layer and unleashes its full potential for full-stack development. Its schema file ZModel is a superset of Prisma schema.
Regardless of ZenStack, the above Prisma file is supposed to be looks like below ideally:
model User {
    id        String @id
    email     String @email
    password  String @password @omit
    // everyone can signup, and user profile is also publicly readable
    @@allow('create,read', true)
}
Actually, that’s exactly what the ZModel would be. You can find it in our example code:
The above attributes are already predefined in our standard library as below:
attribute @email()

attribute @password(saltLength: Int?, salt: String?)

attribute @omit()

attribute @@allow(_ operation: String, _ condition: Boolean)
You can use the same way to define your own attributes.
Access attributes in ZenStack’s plugin
Plugins are ZenStack's extensibility mechanism. Its usage is similar to the generator in Prisma but differs in the following ways:
- They have a cleaner interface without the complexity of JSON-RPC.
- They use an easier-to-program AST representation than generators.
- They can access language features that ZenStack adds to Prisma, like custom attributes and functions.
The implementation of the plugin is similar to the generator but even simpler. You just need to create a node module that exports the function with the signature below:
import { DMMF } from "@prisma/generator-helper";
import { PluginOptions } from "@zenstackhq/sdk";
import { Model } from "@zenstackhq/sdk/ast";

export default async function run(
  model: Model,
  options: PluginOptions,
  dmmf: DMMF.Document
) {
   ....
}
Then you can assess the attributes like:
const userModel = models.find((m) => m.name === 'User');
const userModelAttributes = userModel?.attributes;

const emailField = userModel?.fields.find((f) => f.name === 'email');
const emailFieldAttributes = emailField?.attributes;

const passwordField = userModel?.fields.find((f) => f.name === 'password');
const passwordFieldAttributes = passwordField?.attributes;
The attributes have will have the strong type defined as below:
export interface DataModelFieldAttribute extends AstNode {
    readonly $container: DataModelField;
    readonly $type: 'DataModelFieldAttribute';
    args: Array<AttributeArg>;
    decl: Reference<Attribute>;
}
Internally, ZModel is defined using the great open-source language tool Langium. So the interface is actually generated by Langium.
Overall, you can write a ZenStack plugin using a similar logic to the Prisma generator with type safety in your code and in the user’s schema file.
Bonus
have you noticed that in the entry function of ZenStack, there is also a dmmf parameter which looks familiar? Yes, it is Prisma’s AST model same as the one used in the custom generator. I guess it’s expected as ZModel is a superset of Prisma schema. But if you add the code in the plugin:
const userModel = dmmf.datamodel.models.find((m) => m.name === 'User');
console.log(`user model attribute: ${userModel?.documentation}`);

const emailField = userModel?.fields.find((f) => f.name === 'email');
console.log(`email field attribute: ${emailField?.documentation}`);

const passwordField = userModel?.fields.find((f) => f.name === 'password');
console.log(`password field attribute: ${passwordField?.documentation}`);
After running, you will see exactly the same result as in Prisma generator:
user model attribute: @@allow('create,read', true)
password field attribute: @password
@omit
Actually, if you check out your schema.prisma file generated from ZModel you will get it:
/// @@allow('create,read', true)
model User {
    id String @id() @default(cuid())
    name String?
    /// @email
    email String? @unique()
    /// @password
    /// @omit
    password String?
}
Based on the principle of “never reinvent the wheel”, we do put a value on the existing generators that contributed by the community, like the zod-prisma and prisma-nestjs-graphql. So to make it still work, for any non-Prisma attribute, we will generate it as the triple comments in the schema.prisma file.
So the actual bonus is that you can use ZModel simply as pure prisma + syntactic custom attribute. Although ZenStack has more than that, we are still glad to see any help it could give you!